> ## Documentation Index
> Fetch the complete documentation index at: https://docs.kinemation.xyz/llms.txt
> Use this file to discover all available pages before exploring further.
# 🔫Recoil Animation
> In this section we will cover the recoil animation details.
## How Does It Work?
The **PRAS (Procedural Recoil Animation System)** uses an advanced, yet simple way to generate realistic recoil. The system takes Vector Curves for translation and rotation, plays them in runtime, and uses curve values as interpolation alphas to reach the randomly generated targets.
> RecoilAnimation = Lerp(0f, TargetValue, CurveValue)
where **Target Value** is randomly generated when a shot is fired.
 Recoil curves should be in the range \[-1;1], so a curve value can be used as an interpolation alpha. The curve peaks at 1 and then goes down to 0 with some oscillation.
**Tip**: because curves are much simpler in comparison to other methods (e.g. spring interpolation), the recoil animation is frame-rate independent.
## Single and Auto Fire
**Recoil Data** is an asset, which contains all information about the recoil animation. This includes curves and other settings:
Recoil curves should be in the range \[-1;1], so a curve value can be used as an interpolation alpha. The curve peaks at 1 and then goes down to 0 with some oscillation.
**Tip**: because curves are much simpler in comparison to other methods (e.g. spring interpolation), the recoil animation is frame-rate independent.
## Single and Auto Fire
**Recoil Data** is an asset, which contains all information about the recoil animation. This includes curves and other settings:
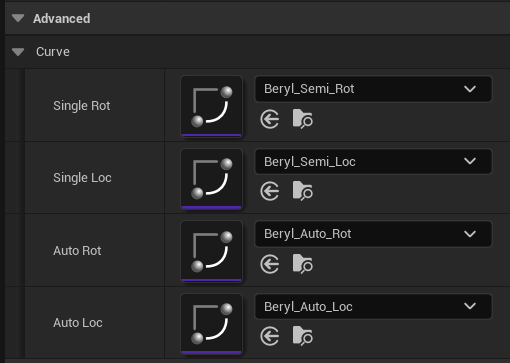 To create a new **Recoil Data**, right-click and go to **Miscellaneous -> Data Asset -> Recoil Data**. This asset includes 4 *Vector Curves* in total: 2 for translation and 2 for rotation. The PRAS has 2 main fire modes:
* Single
* Auto/Burst (there's no technical difference animation-wise)
**Tip**: we use different curves for single and auto fire because of animation quality. If we use single-fire curves when auto-firing, the animation will look choppy. To make it look smoother and more fluid we use a different set of curves.
Let's compare an example single and auto fire curve:
To create a new **Recoil Data**, right-click and go to **Miscellaneous -> Data Asset -> Recoil Data**. This asset includes 4 *Vector Curves* in total: 2 for translation and 2 for rotation. The PRAS has 2 main fire modes:
* Single
* Auto/Burst (there's no technical difference animation-wise)
**Tip**: we use different curves for single and auto fire because of animation quality. If we use single-fire curves when auto-firing, the animation will look choppy. To make it look smoother and more fluid we use a different set of curves.
Let's compare an example single and auto fire curve:

 The curves are almost identical! The only difference is that auto curve values are very close to 0 at some time - this time equals the fire rate of a weapon (in this case 600RPM = 0.1s). This will ensure that the weapon's main muzzle climbing will be fully preserved when auto-firing.
**Tip**: regardless of a fire mode, the first shot is **always** a single fire shot.
The curves are almost identical! The only difference is that auto curve values are very close to 0 at some time - this time equals the fire rate of a weapon (in this case 600RPM = 0.1s). This will ensure that the weapon's main muzzle climbing will be fully preserved when auto-firing.
**Tip**: regardless of a fire mode, the first shot is **always** a single fire shot.