> ## Documentation Index
> Fetch the complete documentation index at: https://docs.kinemation.xyz/llms.txt
> Use this file to discover all available pages before exploring further.
# 🌟Getting Set Up
> In this tutorial you will learn how to set up the plugin.
**Tip**: make sure to already implement basic firing logic in your project.
## Step 1 - Recoil Animation Component
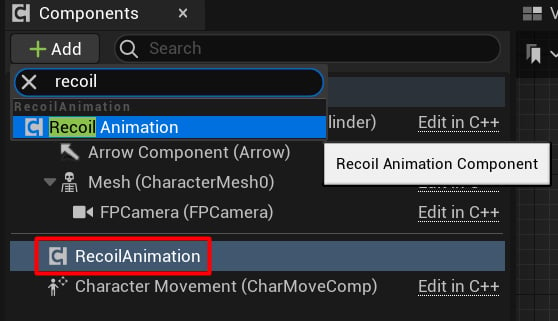
First, it is essential to add the **Recoil Animation Component** to the character.
 ```text theme={null}
UCLASS(config=Game)
class AYourCharacterClass : public ACharacter
{
GENERATED_BODY()
public:
AYourCharacterClass();
protected:
UPROPERTY(EditDefaultsOnly, BlueprintReadOnly, Category = "Recoil")
TObjectPtr RecoilComponent;
...
};
```
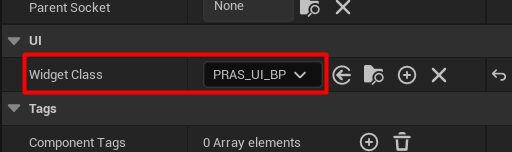
Then, in your character class click on the RecoilAnimation component and specify the Helper UI:
```text theme={null}
UCLASS(config=Game)
class AYourCharacterClass : public ACharacter
{
GENERATED_BODY()
public:
AYourCharacterClass();
protected:
UPROPERTY(EditDefaultsOnly, BlueprintReadOnly, Category = "Recoil")
TObjectPtr RecoilComponent;
...
};
```
Then, in your character class click on the RecoilAnimation component and specify the Helper UI:
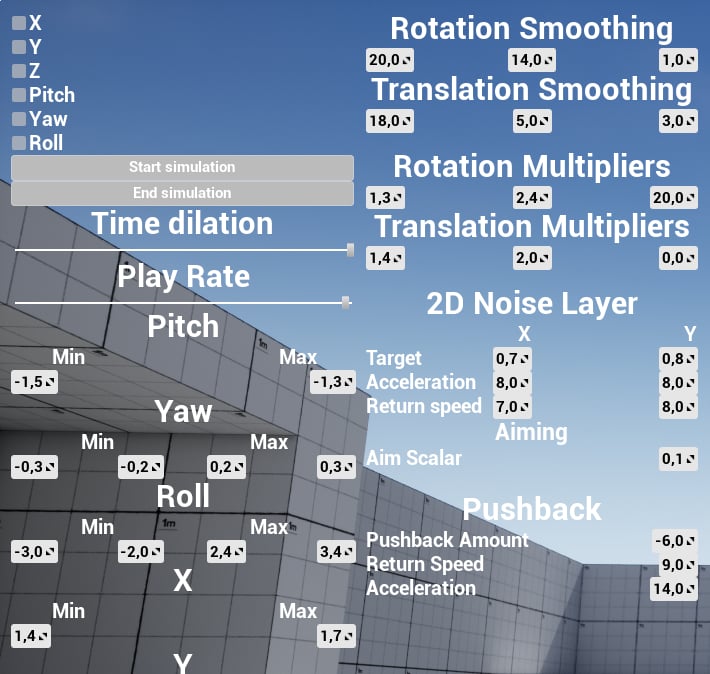
 The Helper UI is useful when you want to modify the recoil values in runtime in a very convenient way:
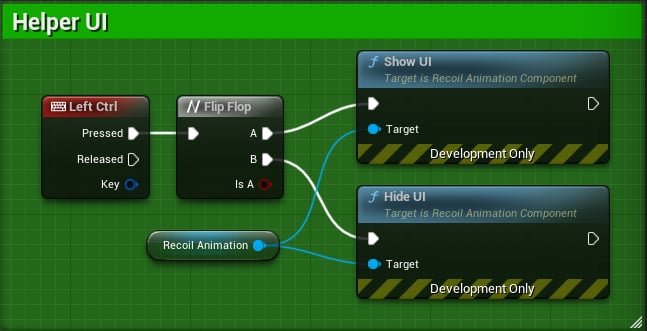
 To enable this Helper UI in the game you can use the Blueprint-exposed methods:
 ## Step 2 - Initialize and Play
Make sure to call the `Init` method of the **Recoil Animation Component** to initialize the recoil animation:
## Step 2 - Initialize and Play
Make sure to call the `Init` method of the **Recoil Animation Component** to initialize the recoil animation:
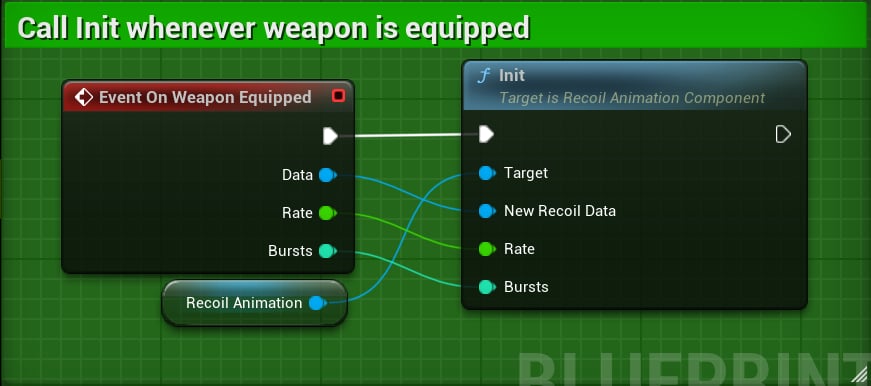 * **Data**: **Recoil Data** asset.
* **Rate**: fire rate or RPM (Rounds-per-minute).
* **Burst:** length of the burst sequence\*\*.\*\*
Next, call `Play` and `Stop` methods when firing:
* **Data**: **Recoil Data** asset.
* **Rate**: fire rate or RPM (Rounds-per-minute).
* **Burst:** length of the burst sequence\*\*.\*\*
Next, call `Play` and `Stop` methods when firing:
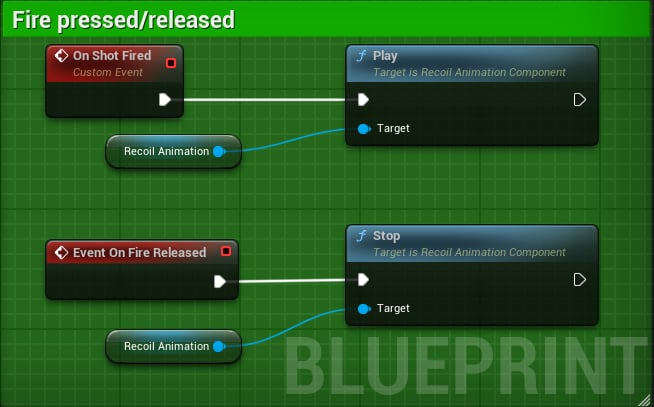 **Note**: Play must be called every shot!
## Step 3 - Animation Blueprint Integration
Make sure to add a **Recoil Animation** node to the Anim Graph:
**Note**: Play must be called every shot!
## Step 3 - Animation Blueprint Integration
Make sure to add a **Recoil Animation** node to the Anim Graph:
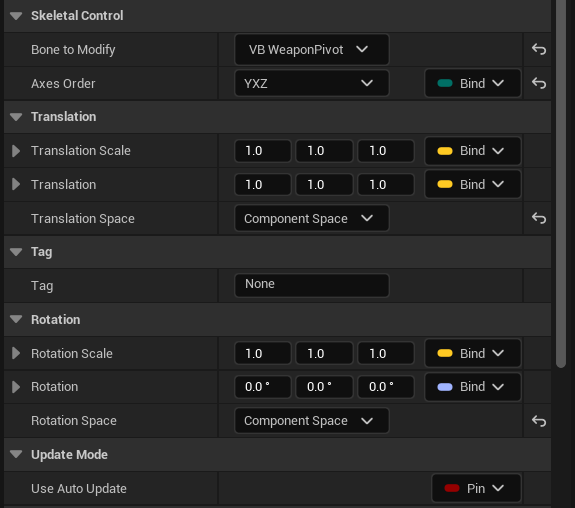
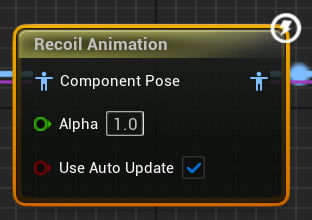 If you already have an *IK* system set up, select the *IK* or a *VB* (virtual bone) you want to animate with recoil in the node settings:
 ### If you need help with IK
First, add Virtual Bones to the character head:
### If you need help with IK
First, add Virtual Bones to the character head:
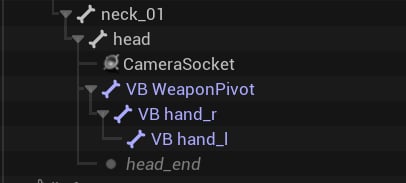 * **VB WeaponPivot** targets ik\_hand\_gun.
* **VB hand\_r** targets hand\_r.
* **VB hand\_l** targets hand\_l.
Add **CopyBone** nodes before the **Recoil Animation** nodes:
* **VB WeaponPivot** targets ik\_hand\_gun.
* **VB hand\_r** targets hand\_r.
* **VB hand\_l** targets hand\_l.
Add **CopyBone** nodes before the **Recoil Animation** nodes:
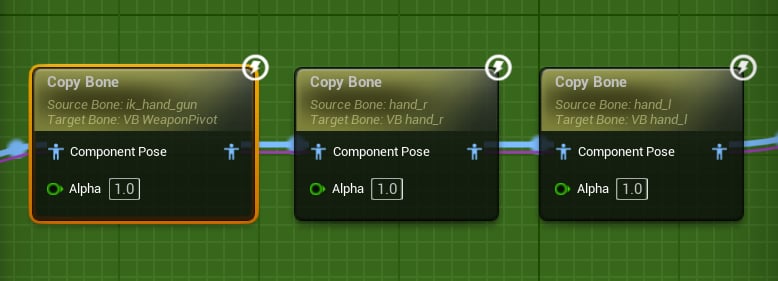 If your animations do not keyframe the **ik\_hand\_gun** bone (it is used for baking gun movement into the character animation), you will have to use **hand\_r** as a source bone in the first **CopyBone** node. You can additionally offset the **VB WeaponPivot** with a custom offset if you want more flexibility.
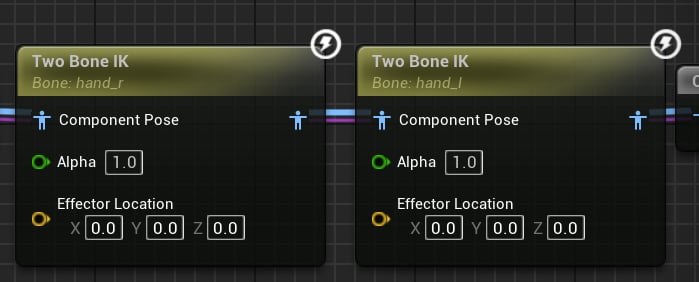
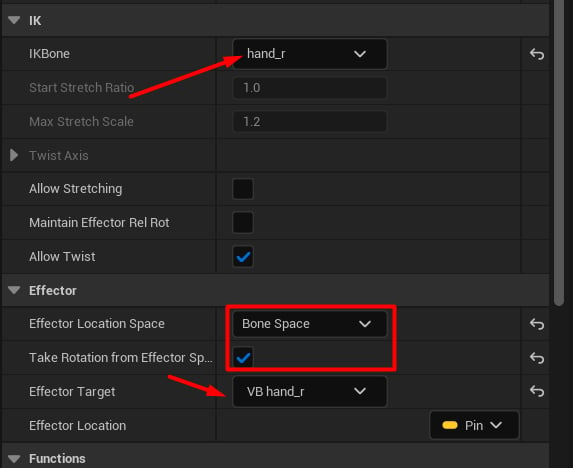
Finally, use **Two Bone IK** after the **Recoil Animation** node:
If your animations do not keyframe the **ik\_hand\_gun** bone (it is used for baking gun movement into the character animation), you will have to use **hand\_r** as a source bone in the first **CopyBone** node. You can additionally offset the **VB WeaponPivot** with a custom offset if you want more flexibility.
Finally, use **Two Bone IK** after the **Recoil Animation** node:
 ***
At this point, the setup is complete. If recoil is still not playing, double-check the steps above or:
* Check if **Recoil Data** has any values.
* The correct bone is animated by the **RecoilAnimation**.
* **Play** method is called every shot.
* The **Fire Rate** is in rounds-per-minute and greater than zero.
If the problem persists, feel free to post a ticket on our [Discord](https://discord.gg/kinemation-1027338787958816860).
***
At this point, the setup is complete. If recoil is still not playing, double-check the steps above or:
* Check if **Recoil Data** has any values.
* The correct bone is animated by the **RecoilAnimation**.
* **Play** method is called every shot.
* The **Fire Rate** is in rounds-per-minute and greater than zero.
If the problem persists, feel free to post a ticket on our [Discord](https://discord.gg/kinemation-1027338787958816860).