> ## Documentation Index
> Fetch the complete documentation index at: https://docs.kinemation.xyz/llms.txt
> Use this file to discover all available pages before exploring further.
# Examples
> Use the supplied Sci-Fi controller, item, and weapon examples as references for your own gameplay implementation.
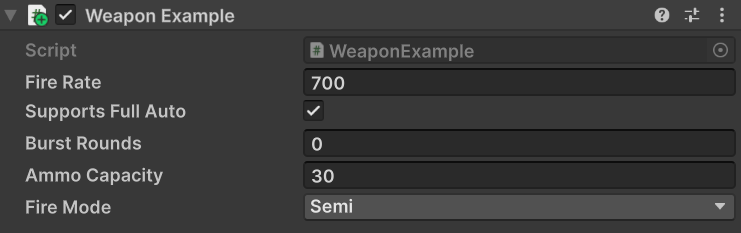
export const weaponExampleImageCaption_0 = "Weapon Example gameplay settings on a supplied firearm."
export const weaponExampleImage_0 =
 export const productName_1 = "Sci-Fi FPS Pack"
export const productName_0 = "Sci-Fi FPS Pack"
export const productName_1 = "Sci-Fi FPS Pack"
export const productName_0 = "Sci-Fi FPS Pack"
 ## What the Example classes are for
The Example classes are executable reference implementations. They show how gameplay code can drive the animation and item presentation APIs, but they are not required base classes for your game.
Use them to answer three questions:
1. Which controller values must gameplay update?
2. Which ItemView lifecycle method corresponds to each gameplay action?
3. How should returned animation durations block incompatible actions?
Replace their movement, inventory, input, and game-state rules with your own architecture.
## GameplayControllerExample
## What the Example classes are for
The Example classes are executable reference implementations. They show how gameplay code can drive the animation and item presentation APIs, but they are not required base classes for your game.
Use them to answer three questions:
1. Which controller values must gameplay update?
2. Which ItemView lifecycle method corresponds to each gameplay action?
3. How should returned animation durations block incompatible actions?
Replace their movement, inventory, input, and game-state rules with your own architecture.
## GameplayControllerExample
GameplayControllerExample demonstrates a complete local character loop:
* Input System callbacks for movement, look, lean, jump, crouch, walk, sprint, free look, use, aim, inspect, and item switching.
* CharacterController movement with ground checks, coyote time, jumping, falling, air acceleration, crouch clearance, and stance transitions.
* Animator parameters for gait, movement direction, aiming, crouching, jumping, and in-air state.
* Per-frame updates to GameplayAnimationController.moveInput, lookInput, deltaLookInput, leanInput, and isAiming.
* Instantiation of configured item prefabs below the skeleton's mapped weapon bone.
* Action sequencing through returned durations, StartAction, StopAction, and HasActiveAction.
At startup, the controller ignores item prefabs without GameplayItemExample. It instantiates valid prefabs, hides their ItemViews, and equips the first item.
When the player changes items, it calls UnEquipItem on the active Example, waits for the returned holster duration, advances the item index, and calls EquipItem on the next Example.
## GameplayItemExample
GameplayItemExample is the gameplay-side adapter used by the reference controller. It caches GameplayItemView from the same GameObject and forwards:
| Example call | View call |
| ------------------------------ | -------------------------------- |
| EquipItem(player) | OnEquipItem(player) |
| UnEquipItem() | OnUnEquipItem() |
| Aim(value) | OnAim(value) |
| UseItem() | OnUseItem() |
| StopUsingItem() | OnStopUsingItem() |
| InspectItem() | OnInspect() |
The adapter has no inventory identity, cooldown, damage, ammo, or networking logic. Its purpose is to make every item look uniform to GameplayControllerExample.
## How to use the examples
Use the examples in layers:
* Compare your input and movement code with GameplayControllerExample to verify the values sent into GameplayAnimationController.
* Compare your inventory equip flow with its instantiate, hide, holster, delay, and equip sequence.
* Copy only the ItemView lifecycle calls required by your item.
* Keep your own authority and state decisions before those presentation calls.
A useful integration boundary is:
```text theme={null}
Input or network command
-> gameplay validates the action
-> gameplay changes authoritative state
-> gameplay calls the ItemView presentation method
-> returned duration controls local action overlap
```
The components in {productName_0} use this boundary. You can remove the Example classes after your controller reproduces the required animation-controller values and ItemView calls.
## ShooterControllerExample
ShooterControllerExample extends GameplayControllerExample with reload and fire-mode input. It treats the active item as WeaponExample, stops held fire before reload, and rejects reload or fire-mode changes while another controller action is active.
This class demonstrates input orchestration. It does not implement projectiles, hitscan, damage, weapon ownership, or networking.
## WeaponExample
{weaponExampleImage_0}
WeaponExample is the gameplay-side reference paired with WeaponView. Both components live on the same weapon prefab.
| Field | Demonstrated gameplay rule |
| ---------------------- | ---------------------------------------------------------------------- |
| **Fire Rate** | Converts rounds per minute into a delay of 60 / fireRate. |
| **Supports Full Auto** | Adds Auto to the fire-mode cycle. |
| **Burst Rounds** | Enables Burst and limits the scheduled shots in that burst. |
| **Ammo Capacity** | Initializes and clamps the example's active ammo. |
| **Fire Mode** | Selects Semi, Burst, or Auto behavior. |
The class implements IWeaponAmmo. WeaponView finds that interface on its own GameObject and reads it to choose loaded or empty fire clips and tactical or empty reload clips.
The example owns demo cadence and ammo mutation:
1. UseItem validates active ammo and the fire-rate delay.
2. Fire subtracts one round, calls WeaponView\.OnUseItem, and schedules another shot when the selected mode requires it.
3. StopUsingItem cancels scheduled shots and stops recoil through the view.
4. Reload asks the view to select and play the correct reload presentation.
5. ChangeFireMode cycles only through modes enabled by the component fields.
It does not restore ammo when the reload animation finishes. A production weapon should change authoritative ammo through its own reload logic or animation-event policy.
## ChargeWeaponExample
ChargeWeaponExample specializes the demo's Burst mode into hold-to-charge behavior:
* Pressing use calls the view without immediately subtracting rounds.
* ChargeWeaponView plays charge-start and then repeats the charge loop.
* Releasing use subtracts burstRounds, calls PlayFireEffects, and stops the charge loop.
Semi and Auto still use the inherited WeaponExample cadence. Treat this as the reference for the {productName_1} energy charge rifle, then connect the release event to your own ammo and firing authority.
## Implement the same boundary
Your production gameplay component may replace WeaponExample entirely. Keep an IWeaponAmmo implementation on the same GameObject as WeaponView if the view should select loaded, empty, or partial presentation from current ammo.
```csharp theme={null}
using UnityEngine;
using KINEMATION.ProceduralRecoilAnimationSystem.Runtime;
using KINEMATION.Shared.ShooterCore.Scripts.Runtime;
public sealed class ProjectWeapon : MonoBehaviour, IWeaponAmmo
{
[SerializeField] private WeaponView weaponView;
[SerializeField] private int capacity = 30;
[SerializeField] private float roundsPerMinute = 600f;
private int activeAmmo;
private FireMode fireMode = FireMode.Semi;
private void Awake()
{
activeAmmo = capacity;
}
public float PresentEquip(GameObject player)
{
return weaponView.OnEquipItem(roundsPerMinute, fireMode, player);
}
public void FireAuthoritatively()
{
if (activeAmmo <= 0)
{
return;
}
activeAmmo--;
weaponView.OnUseItem();
}
public int GetActiveAmmo() => activeAmmo;
public int GetAmmoCapacity() => capacity;
public void AddAmmo(int amount = 0)
{
activeAmmo = Mathf.Clamp(activeAmmo + amount, 0, capacity);
}
public void RestoreAmmo()
{
activeAmmo = capacity;
}
}
```
The example leaves hit detection, projectiles, damage, replication, reload completion, and persistence to your gameplay code. The view remains responsible for paired animation, recoil, audio, VFX, FOV, and camera feedback.
## Supplied reference setup
The player reference is Assets/KINEMATION/SciFiPack/Prefabs/Player/FPS\_SciFi\_Arms.prefab. Its item list instantiates the six supplied W\_\* prefabs below the mapped weapon bone.
Each item prefab carries two distinct components:
* A concrete ItemView that owns presentation.
* An Example component that demonstrates gameplay state and calls the view.
See [Item views](/sci-fi-fps-pack/unity/general/item-views) for the exact pairing on the energy charge rifle, standard firearms, throwable, revolver, launcher, and shotgun.
## Adapt an example
Test equip, holster, aim, use, stop-use, inspect, reload, and item switching before replacing code.
Start at the Input System callback, follow the active Example component, and note the ItemView method it invokes.
Move inventory, ammo, cooldown, projectile, damage, authority, and networking decisions into your own gameplay classes.
Invoke the matching ItemView lifecycle after your gameplay validates the action. Use returned durations to prevent incompatible local actions.
Remove it once your implementation supplies every required controller value and view call.
Do not use GameplayControllerExample, GameplayItemExample, or WeaponExample as authoritative multiplayer gameplay. They are local examples designed to demonstrate the animation and presentation API.