> ## Documentation Index
> Fetch the complete documentation index at: https://docs.kinemation.xyz/llms.txt
> Use this file to discover all available pages before exploring further.
# Character setup
> Create a project-owned Sci-Fi FPS Pack character, retarget its animations, and add custom virtual bones.
export const productName_2 = "Sci-Fi FPS Pack"
export const intro_2 = "Add the custom virtual bones required by the target character's procedural animation and IK setup after the animation override is active."
export const skeletonAssetName_0 = "the Skeleton used by SKM_Operator"
export const sourceBoneGuidance_0 = "the parent or reference bone required by the target IK or aiming setup"
export const targetBoneGuidance_0 = "the bone that the virtual bone should follow"
export const virtualBoneNaming_0 = "the naming convention used by the target Animation Blueprint, keeping Unreal's VB prefix"
export const animationBlueprintName_0 = "ABP_SciFi-FPS"
export const expectedResult_2 = "The target Skeleton contains the virtual bones required by ABP_SciFi-FPS, and the procedural graph resolves its IK and aiming targets when BP_ProjectPlayer is previewed."
export const productName_1 = "Sci-Fi FPS Pack"
export const intro_1 = "Use an animation override to keep the source Sci-Fi FPS Pack assets unchanged while you retarget their character and item animations to the project mesh."
export const targetMeshName_0 = "SKM_Operator"
export const overrideAssetName_0 = "DA_SKM_Operator_Override"
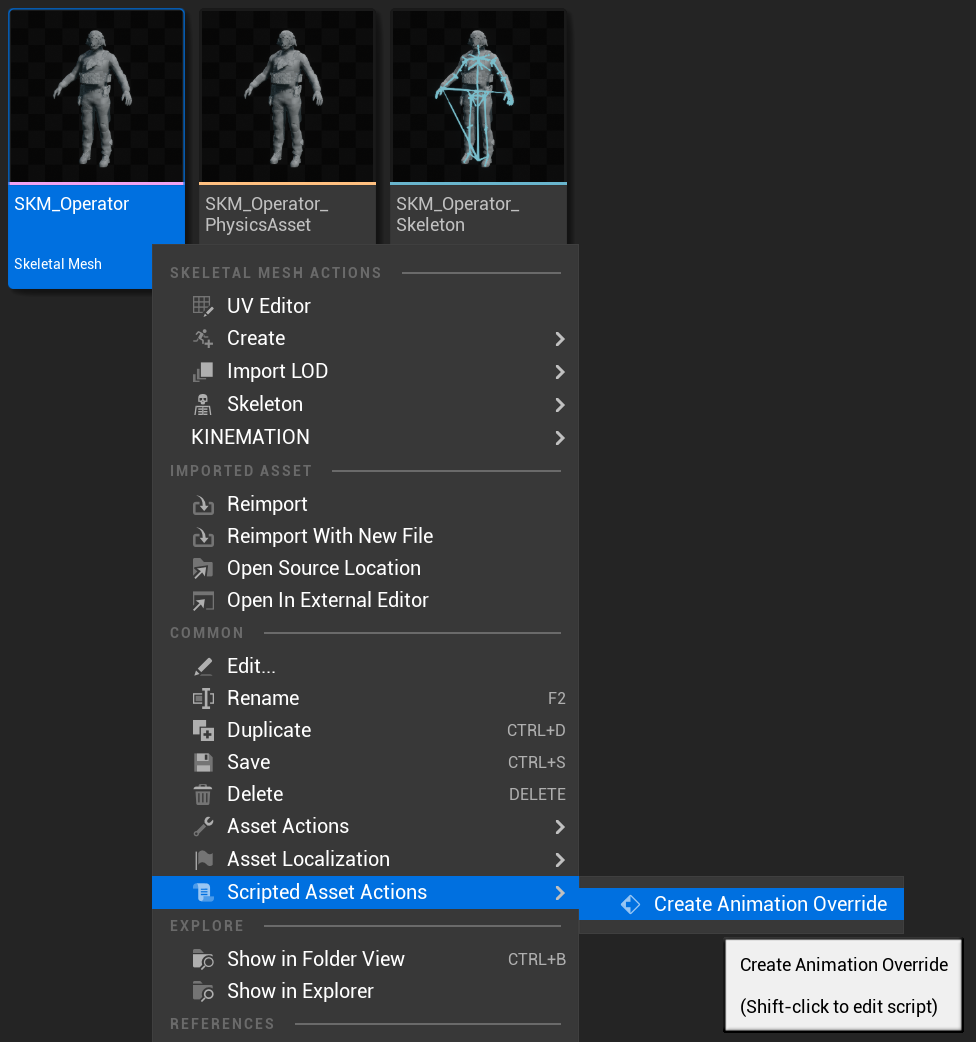
export const createOverrideImageCaption_0 = "Create an animation override from the custom skeletal mesh."
export const createOverrideImage_0 =
 export const targetConfigName_0 = "DA_SciFi-FPS_Config"
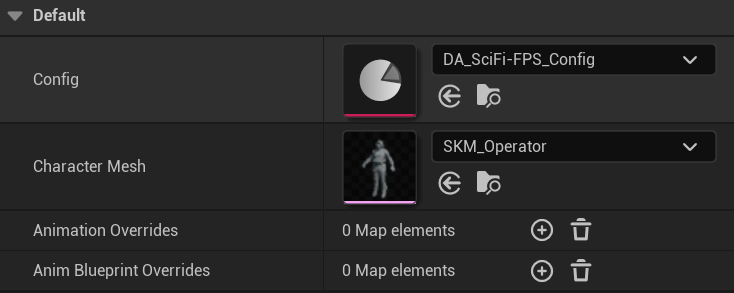
export const targetConfigImageCaption_0 = "Assign the target configuration and character mesh to the override asset."
export const targetConfigImage_0 =
export const targetConfigName_0 = "DA_SciFi-FPS_Config"
export const targetConfigImageCaption_0 = "Assign the target configuration and character mesh to the override asset."
export const targetConfigImage_0 =
 export const retargetActionImageCaption_0 = "Open Retarget Animations for the created override asset."
export const retargetActionImage_0 =
export const retargetActionImageCaption_0 = "Open Retarget Animations for the created override asset."
export const retargetActionImage_0 =
 export const ikRetargeterName_0 = "IKRetargeter_UE5_UE5"
export const retargetAssetSummary_0 = "54 animation assets and 4 Animation Blueprints"
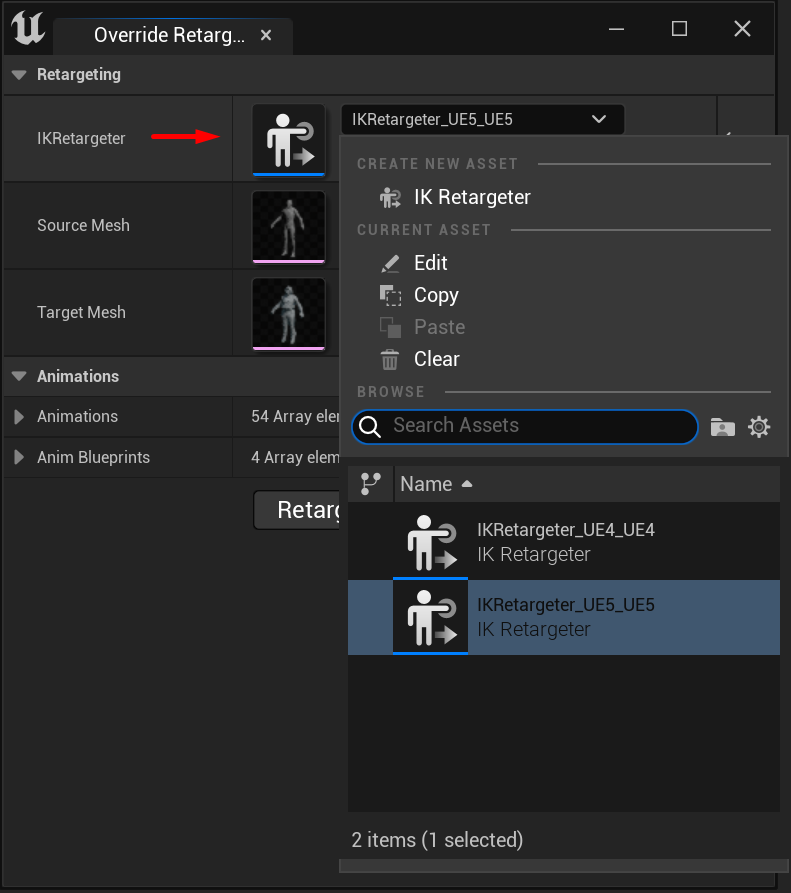
export const retargeterImageCaption_0 = "Choose the UE5-to-UE5 IK Retargeter in the Override Retarget window."
export const retargeterImage_0 =
export const ikRetargeterName_0 = "IKRetargeter_UE5_UE5"
export const retargetAssetSummary_0 = "54 animation assets and 4 Animation Blueprints"
export const retargeterImageCaption_0 = "Choose the UE5-to-UE5 IK Retargeter in the Override Retarget window."
export const retargeterImage_0 =
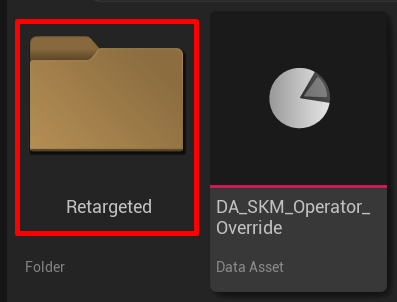
 export const resultFolderName_0 = "Retargeted"
export const resultFolderImageCaption_0 = "Choose the project-owned folder for the generated retargeted assets."
export const resultFolderImage_0 =
export const resultFolderName_0 = "Retargeted"
export const resultFolderImageCaption_0 = "Choose the project-owned folder for the generated retargeted assets."
export const resultFolderImage_0 =
 export const characterBlueprintName_1 = "BP_ProjectPlayer"
export const finalMeshImageCaption_0 = "Set the target mesh on the character Blueprint Mesh component."
export const finalMeshImage_0 =
export const characterBlueprintName_1 = "BP_ProjectPlayer"
export const finalMeshImageCaption_0 = "Set the target mesh on the character Blueprint Mesh component."
export const finalMeshImage_0 =
 export const finalStateImageCaption_0 = "Final state with the animation override added under the Gameplay Animation component Overrides list."
export const finalStateImage_0 =
export const finalStateImageCaption_0 = "Final state with the animation override added under the Gameplay Animation component Overrides list."
export const finalStateImage_0 =
 export const expectedResult_1 = "BP_ProjectPlayer uses SKM_Operator, AC_GameplayAnimation contains DA_SKM_Operator_Override, and the override maps route playback to retargeted assets without modifying the original Sci-Fi FPS Pack content."
export const productName_0 = "Sci-Fi FPS Pack"
export const intro_0 = "Create a child of the supplied character, retain the inherited Gameplay Framework and ShooterCore components, configure the supplied item classes, and validate the project pawn."
export const characterBlueprintName_0 = "BP_ProjectPlayer"
export const characterClass_0 = "BP_SciFi_Character"
export const inheritedComponents_0 = <>
export const expectedResult_1 = "BP_ProjectPlayer uses SKM_Operator, AC_GameplayAnimation contains DA_SKM_Operator_Override, and the override maps route playback to retargeted assets without modifying the original Sci-Fi FPS Pack content."
export const productName_0 = "Sci-Fi FPS Pack"
export const intro_0 = "Create a child of the supplied character, retain the inherited Gameplay Framework and ShooterCore components, configure the supplied item classes, and validate the project pawn."
export const characterBlueprintName_0 = "BP_ProjectPlayer"
export const characterClass_0 = "BP_SciFi_Character"
export const inheritedComponents_0 = <>Camera, AC_FirstPersonCamera, AC_GameplayAnimation, AC_IKMotionPlayer, and AC_RecoilAnimation
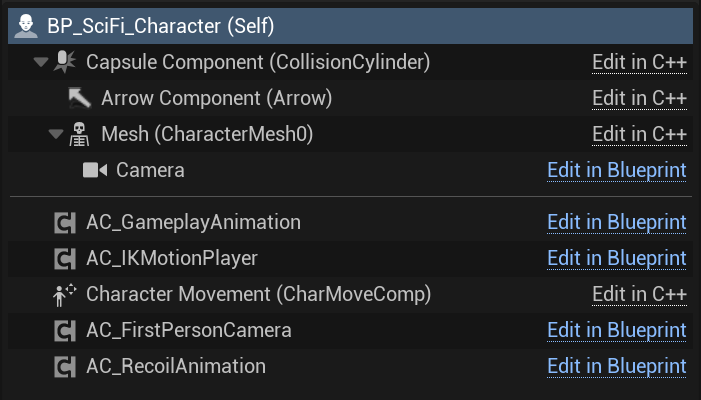
export const characterComponentsCaption_0 = "BP_SciFi_Character inherits camera, gameplay animation, IK motion, recoil, and character presentation components."
export const characterComponentsImage_0 =
 export const itemClasses_0 = <>
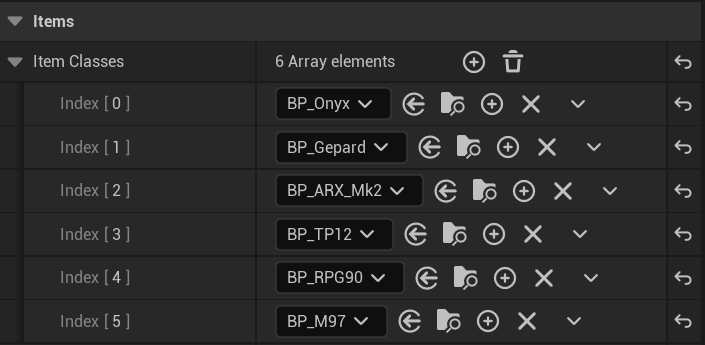
BP_ARX_Mk2, BP_Gepard, BP_M97, BP_Onyx, BP_RPG90, and BP_TP12, or a tested subset
export const itemClassesCaption_0 = "BP_SciFi_Character item class list with the six supplied Sci-Fi weapons."
export const itemClassesImage_0 =
 export const mappingContexts_0 = <>
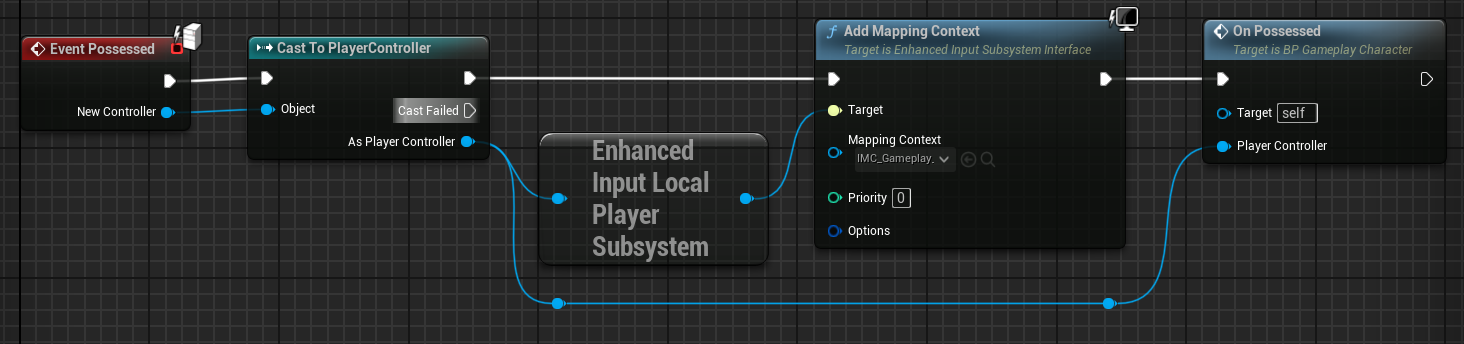
IMC_Gameplay_Core and IMC_Shooter_Core
export const possessionCaption_0 = "BP_Gameplay_Character possession event extending the parent setup path."
export const possessionImage_0 =
 export const demoMap_0 = "/Game/KINEMATION/Sci-fi_FPS_Pack/Demo/Maps/Sci-fi_Shooter_Map"
export const expectedResult_0 = "BP_ProjectPlayer is the project-owned child character, inherits the supplied runtime components, spawns the configured item classes, and responds to the shared Gameplay Framework and ShooterCore input contexts."
This setup combines the pack character workflow with the [Animation override](/sci-fi-fps-pack/unreal/tutorials/animation-override) workflow. Create the project character, retarget the animation set to its mesh, apply the override, and then add any virtual bones required by the procedural Animation Blueprint.
## Before you begin
* Complete [Installation](/sci-fi-fps-pack/unreal/get-started/installation) and review [Sci-Fi content](/sci-fi-fps-pack/unreal/get-started/sci-fi-content).
* Create project-owned folders for the child Blueprint, animation configuration, override asset, retargeted assets, and virtual-bone changes.
* Prepare
export const demoMap_0 = "/Game/KINEMATION/Sci-fi_FPS_Pack/Demo/Maps/Sci-fi_Shooter_Map"
export const expectedResult_0 = "BP_ProjectPlayer is the project-owned child character, inherits the supplied runtime components, spawns the configured item classes, and responds to the shared Gameplay Framework and ShooterCore input contexts."
This setup combines the pack character workflow with the [Animation override](/sci-fi-fps-pack/unreal/tutorials/animation-override) workflow. Create the project character, retarget the animation set to its mesh, apply the override, and then add any virtual bones required by the procedural Animation Blueprint.
## Before you begin
* Complete [Installation](/sci-fi-fps-pack/unreal/get-started/installation) and review [Sci-Fi content](/sci-fi-fps-pack/unreal/get-started/sci-fi-content).
* Create project-owned folders for the child Blueprint, animation configuration, override asset, retargeted assets, and virtual-bone changes.
* Prepare SKM\_Operator and the compatible IKRetargeter\_UE5\_UE5 asset.
* Keep the target mesh, Skeleton, Animation Blueprint, and UE4 or UE5 animation family compatible.
## Set up {productName_0}
{intro_0}
Create a child Blueprint named {characterBlueprintName_0} from {characterClass_0}. Store the child in a project-owned content folder.
Keep {inheritedComponents_0}. Configure project-specific behavior in the child instead of rebuilding the parent flow.
{characterComponentsImage_0}
Populate ItemClasses with {itemClasses_0}. The parent spawns these classes into the runtime Items array.
{itemClassesImage_0}
Call the parent OnPossessed behavior before project-specific setup. Add {mappingContexts_0} to the owning local player's Enhanced Input subsystem.
{possessionImage_0}
Set {characterBlueprintName_0} as the default pawn in a valid project game mode. Open {demoMap_0} and run play-in-editor.
{expectedResult_0}
## Create an animation override for {productName_1}
{intro_1}
In the Content Browser, select {targetMeshName_0}. Right-click it and choose **Scripted Asset Actions > Create Animation Override**. Unreal creates {overrideAssetName_0} as a data asset.
{createOverrideImage_0}
Select {overrideAssetName_0}. Set **Config** to {targetConfigName_0} and confirm that **Character Mesh** references {targetMeshName_0}.
{targetConfigImage_0}
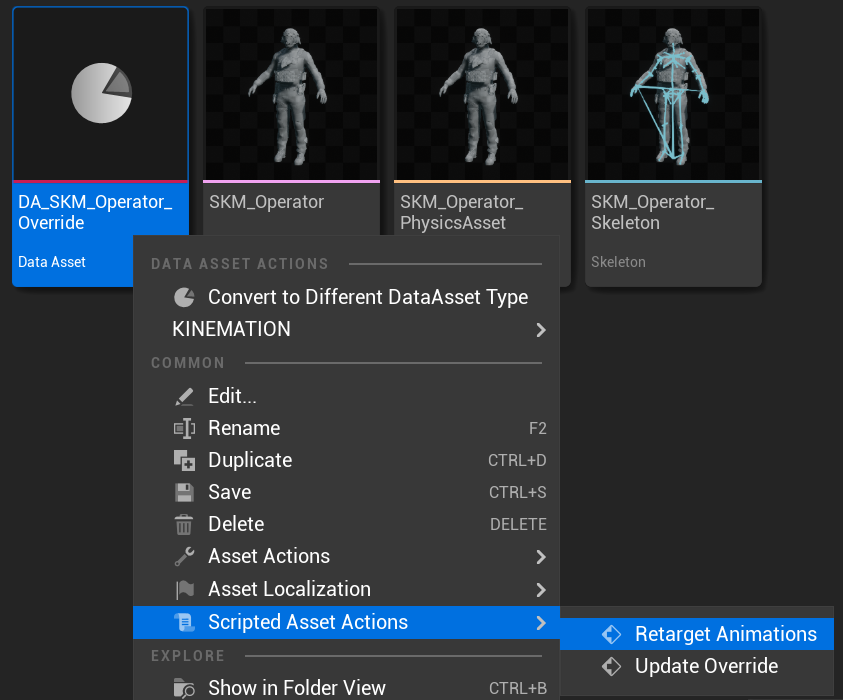
Right-click {overrideAssetName_0} and choose **Scripted Asset Actions > Retarget Animations**.
{retargetActionImage_0}
In the **Retargeting** section, set **IKRetargeter** to {ikRetargeterName_0}. Confirm that **Source Mesh** and **Target Mesh** resolve to the intended skeletons. Review {retargetAssetSummary_0} under **Animations** and **Anim Blueprints**, then click **Retarget**.
{retargeterImage_0}
Choose the project-owned {resultFolderName_0} folder when the retarget window asks where to store the generated assets. Keep generated files outside the imported pack content.
{resultFolderImage_0}
After retargeting completes, select {overrideAssetName_0} again and run **Scripted Asset Actions > Update Override**. This refreshes the **Animation Overrides** and **Anim Blueprint Overrides** maps with the generated replacements.
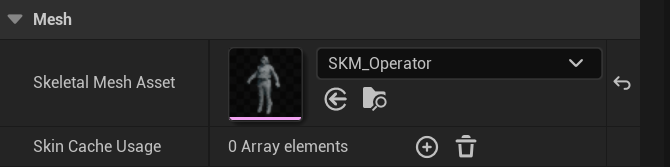
Open {characterBlueprintName_1}. Select its **Mesh** component and set **Skeletal Mesh Asset** to {targetMeshName_0}.
{finalMeshImage_0}
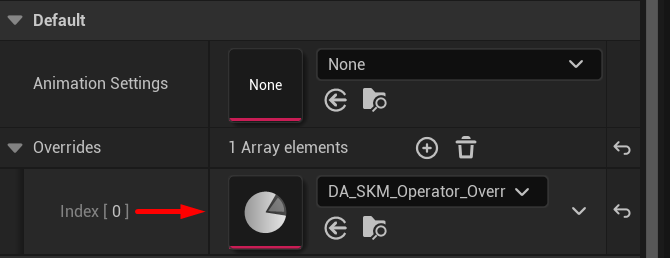
Then select the **Gameplay Animation** component (AC\_GameplayAnimation) and add {overrideAssetName_0} under **Overrides**. Save the Blueprint. The override list should contain the new asset as shown in the final state.
{finalStateImage_0}
{expectedResult_1}
## Add custom virtual bones to {productName_2}
{intro_2}
Virtual bones are non-skinnable entries in a Skeleton. Each one is parented to a source bone and follows a separate target bone. Animation Blueprints can use them as stable IK, aiming, or look-at targets.
Open {skeletonAssetName_0} in the Animation or Skeleton Editor. Confirm that this is the Skeleton used by the target character mesh and procedural Animation Blueprint.
In the **Skeleton Tree**, select {sourceBoneGuidance_0}. This bone becomes the parent of the new virtual bone.
Right-click the selected bone and choose **Add Virtual Bone**. In **Pick Target Bone**, choose {targetBoneGuidance_0}. Unreal adds a VB-prefixed entry to the Skeleton Tree.
Rename the virtual bone using {virtualBoneNaming_0}. Repeat the process for each target required by {animationBlueprintName_0}, then save the Skeleton.
Open {animationBlueprintName_0} and confirm that its IK, aiming, or look-at nodes reference the new virtual bones. Preview a movement and aiming pose before testing the character in play-in-editor.
Virtual bones belong to the Skeleton and are generated for animation playback. They do not add skinned geometry or replace a required authored bone.
{expectedResult_2}
## Next step
Continue to [Project integration](/sci-fi-fps-pack/unreal/tutorials/project-integration).