> ## Documentation Index
> Fetch the complete documentation index at: https://docs.kinemation.xyz/llms.txt
> Use this file to discover all available pages before exploring further.
# 🔌FPS Animation Pack Integration
> This page explains how to integrate the asset with the FPS Animation Pack.
## Importing Content
To make **Tactical Shooter Pack** weapons work with the **FPS Animation Pack**, make sure to import the animations, models and sounds into your project:
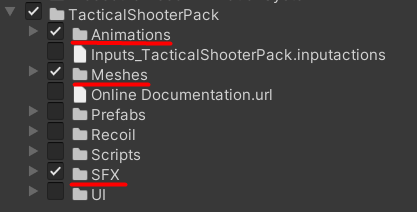 **Note**: Scripts from the **Tactical Shooter Pack** are not required.
## Animator Controllers
Next, we need to create an Override Animator Controller for our character and weapon. To do this, right-click and select: **Create/Animator Override Controller**:
**Note**: Scripts from the **Tactical Shooter Pack** are not required.
## Animator Controllers
Next, we need to create an Override Animator Controller for our character and weapon. To do this, right-click and select: **Create/Animator Override Controller**:
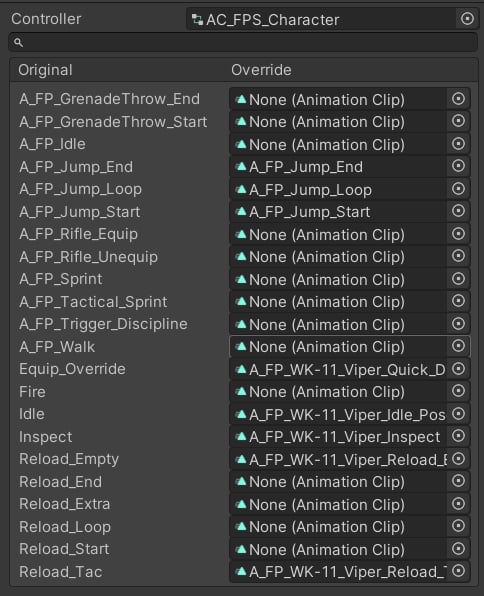 Select the **AC\_FPS\_Character** as the main controller, and then override these properties with clips from the **Tactical Shooter Pack**:
* Jump Start, Loop, End
* Equip Override
* Idle
* Reload Empty, Tac
* Reload Start, Loop End (for the shotgun)
**Note**: Make sure to use animations from the **Tactical Shooter Pack**, as it uses a different skeleton!
Select the **AC\_FPS\_Character** as the main controller, and then override these properties with clips from the **Tactical Shooter Pack**:
* Jump Start, Loop, End
* Equip Override
* Idle
* Reload Empty, Tac
* Reload Start, Loop End (for the shotgun)
**Note**: Make sure to use animations from the **Tactical Shooter Pack**, as it uses a different skeleton!
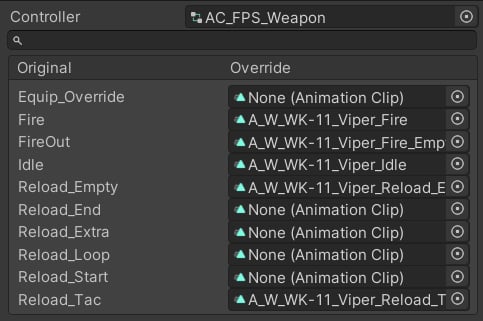 Similarly, create an Animator Controller for the gun using the **AC\_FPS\_Weapon** controller from the **FPS Animation Pack**. Here are the clips that needs to be overridden:
* Fire, Fire Out (Empty)
* Idle
* Reload Empty, Reload Tac
* Reload Start, Loop, End
## Weapon Settings
**FPS Animation Pack** relies on **Weapon Settings** to store weapon-specific properties. To create a new asset, right-click and select **Create/KINEMATION/FPS Animation Pack/Weapon Settings**.
Once created, make sure to assign the previously created Character Controller:
Similarly, create an Animator Controller for the gun using the **AC\_FPS\_Weapon** controller from the **FPS Animation Pack**. Here are the clips that needs to be overridden:
* Fire, Fire Out (Empty)
* Idle
* Reload Empty, Reload Tac
* Reload Start, Loop, End
## Weapon Settings
**FPS Animation Pack** relies on **Weapon Settings** to store weapon-specific properties. To create a new asset, right-click and select **Create/KINEMATION/FPS Animation Pack/Weapon Settings**.
Once created, make sure to assign the previously created Character Controller:
 You can adjust other properties too (e.g., recoil, fire rate, sounds) using the [FPS Animation Pack documentation](/fps-animation-pack/unity/gameplay/weapon-system).
## Weapon Event Sounds
**FPS Animation Pack** plays weapon-specific sounds (e.g., reloads) from the Weapon Event Sounds list:
You can adjust other properties too (e.g., recoil, fire rate, sounds) using the [FPS Animation Pack documentation](/fps-animation-pack/unity/gameplay/weapon-system).
## Weapon Event Sounds
**FPS Animation Pack** plays weapon-specific sounds (e.g., reloads) from the Weapon Event Sounds list:
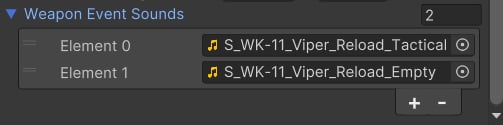 These sounds are played via the **PlayWeaponSound** animation event, which is attached to the weapon animation (clips marked with W):
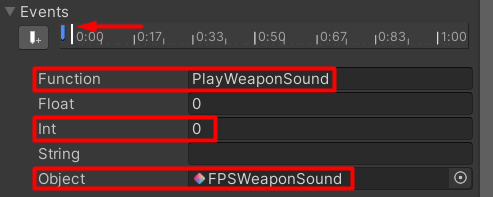 You can add these events to weapon clips from the Tactical Shooter Pack.
**Note**: The Int value represents the index of a sound to play.
## Weapon Prefab
Next, we need to create a new prefab for our weapon. Add the **FPSWeapon** component to it:
You can add these events to weapon clips from the Tactical Shooter Pack.
**Note**: The Int value represents the index of a sound to play.
## Weapon Prefab
Next, we need to create a new prefab for our weapon. Add the **FPSWeapon** component to it:
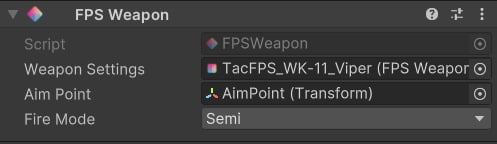 Assign the previously created weapon settings. Now add a weapon model and an aim point transform to it:
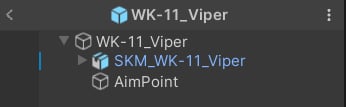 Make sure to assign the aim point transform in the FPS Weapon component. Next, add the Animator to the weapon model:
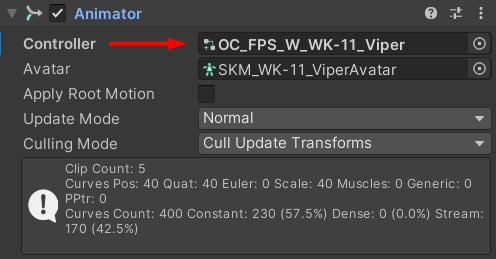 ## Character Prefab
Duplicate the `FPSPlayer` prefab from the **FPS Animation Pack**, and add the Operator model from the **Tactical Shooter Pack** to it:
## Character Prefab
Duplicate the `FPSPlayer` prefab from the **FPS Animation Pack**, and add the Operator model from the **Tactical Shooter Pack** to it:
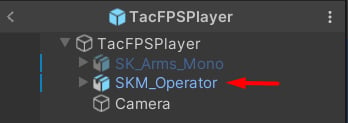 Copy all components from SK\_Arms\_Mono to the SKM\_Operator. Once the setup is complete, you can remove the SK\_Arms\_Mono model.
### Animator
In the Animator component, make sure to set the Avatar to "None", as Operator model doesn't have an Avatar by default.
## FPS Player
Now we need to create Player Settings - this asset contains player-related properties:
Copy all components from SK\_Arms\_Mono to the SKM\_Operator. Once the setup is complete, you can remove the SK\_Arms\_Mono model.
### Animator
In the Animator component, make sure to set the Avatar to "None", as Operator model doesn't have an Avatar by default.
## FPS Player
Now we need to create Player Settings - this asset contains player-related properties:
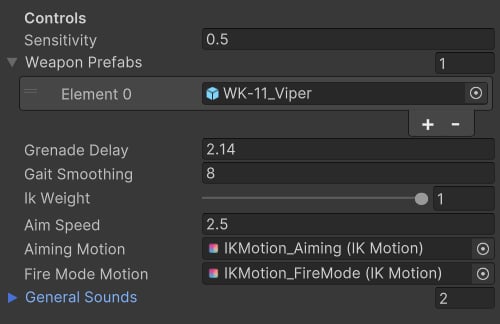 Update the Player Settings and all bone references:
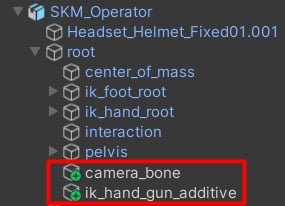
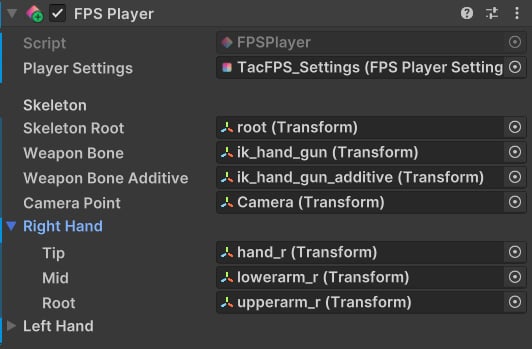 **Note**: ik\_han\_gun\_additive is not a native bone, so add and parent it to the `root` bone as an empty Game Object.
 At this point, our character and weapon should be correctly animated using clips from the Tactical Shooter Pack. If something doesn't work as expected, feel free to reach out via [Discord](https://discord.gg/kinemation-1027338787958816860).
## Camera Animations
To make the camera animations work, add the `camera_bone` empty Game Object similarly to the image above. Then, go to the **Camera** component and update the camera\_bone reference:
At this point, our character and weapon should be correctly animated using clips from the Tactical Shooter Pack. If something doesn't work as expected, feel free to reach out via [Discord](https://discord.gg/kinemation-1027338787958816860).
## Camera Animations
To make the camera animations work, add the `camera_bone` empty Game Object similarly to the image above. Then, go to the **Camera** component and update the camera\_bone reference:
 ## Hiding Mesh Parts
The Operator model is a full-body character, but it's possible to hide some of it meshes to better fit the first-person view. To do this, simply select the meshes you don't want and disable their **Skinned Mesh Renderer**:
## Hiding Mesh Parts
The Operator model is a full-body character, but it's possible to hide some of it meshes to better fit the first-person view. To do this, simply select the meshes you don't want and disable their **Skinned Mesh Renderer**:
