> ## Documentation Index
> Fetch the complete documentation index at: https://docs.kinemation.xyz/llms.txt
> Use this file to discover all available pages before exploring further.
# 🔌GASP Integration
> This tutorial shows how to integrate the Tactical Shooter Pack with GASP.
## Character meshes
**Note:** Compatible with GASP **5.4**, **5.5**, **5.6**. Add the latest Tactical Shooter Pack to your GASP project before starting.
First, we need to create a base for our integration. Duplicate the **BP\_TacticalShooterCharacter** (**KINEMATION/TacticalShooterPack/Blueprints**):
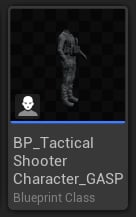 This will be our main player blueprint. Open it up, go to **Class Settings** and inherit it from the **CBP\_SandboxCharacter**:
 Next, select the "Mesh" and set its animation blueprint to **ABP\_SandboxCharacter** and skeletal mesh to **SKM\_UEFN\_Mannequin**:

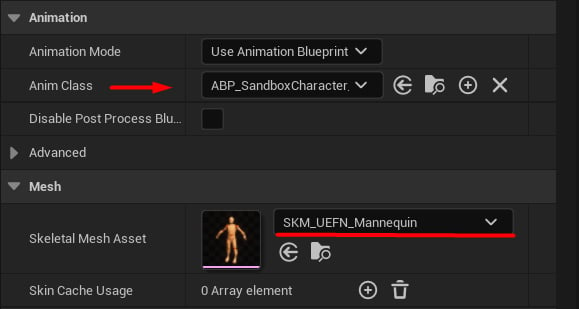 **Note**: The "Mesh" skeletal component will generate a motion-matching pose (full-body movement), which will be blended with our tactical animations.
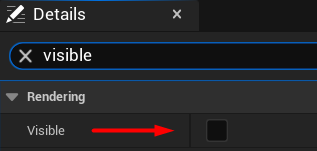
Set **Visible** to **false** and **Visibility Based Anim Tick Option** to **Always Tick Pose and Refresh Bones**:
**Note**: The "Mesh" skeletal component will generate a motion-matching pose (full-body movement), which will be blended with our tactical animations.
Set **Visible** to **false** and **Visibility Based Anim Tick Option** to **Always Tick Pose and Refresh Bones**:
 Now we need to add a skeletal mesh for our character model. Let's call it "Player" and parent the **Camera** component to it:
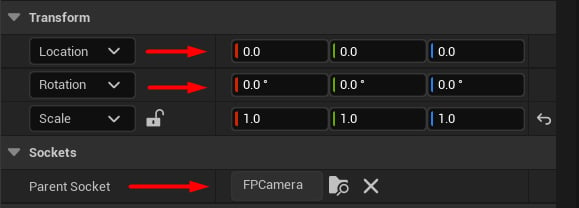
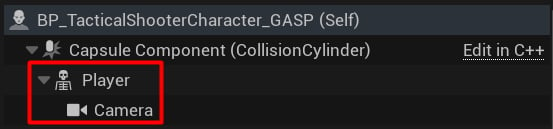 In the **Camera** settings, set its parent socket to `FPCamera` and reset its transform:
 Find the `GetPlayerMesh` interface function and return the new "Player" skeletal mesh component:
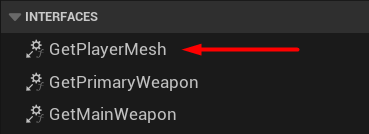
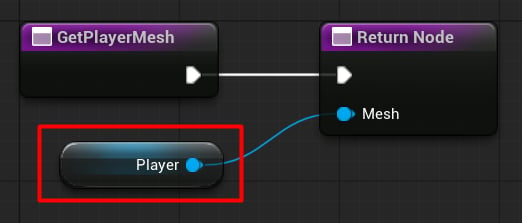 **Tip**: This interface function is used by weapons and animation blueprints to play animations, so make sure to provide the correct reference here.
## Cameras
The second step is to properly set up cameras in our player blueprint.
If you use GASP 5.5 or 5.6, make sure to use this code snippet to disable other cameras:
**Tip**: This interface function is used by weapons and animation blueprints to play animations, so make sure to provide the correct reference here.
## Cameras
The second step is to properly set up cameras in our player blueprint.
If you use GASP 5.5 or 5.6, make sure to use this code snippet to disable other cameras:
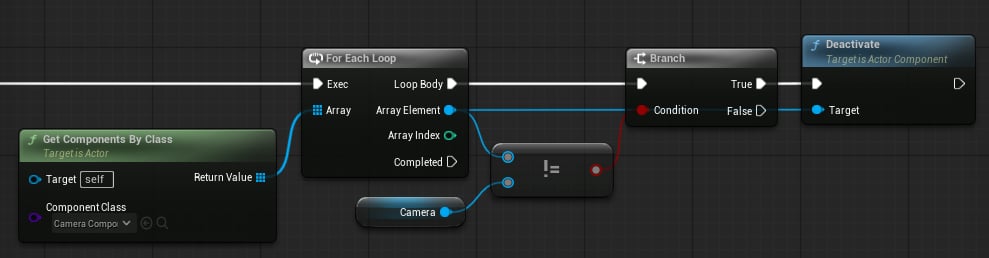 The **Camera** attached to **Player** is the main first‑person camera. Deactivate all other cameras that may be active at game start.
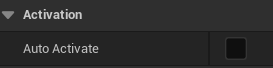
If you are on 5.4, then simply set all other cameras' `Auto Activate` property to **false**:
The **Camera** attached to **Player** is the main first‑person camera. Deactivate all other cameras that may be active at game start.
If you are on 5.4, then simply set all other cameras' `Auto Activate` property to **false**:
 ## Inputs
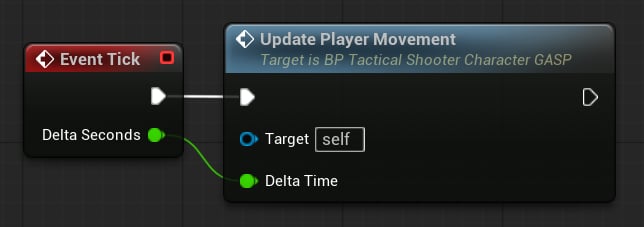
The next step is to properly update GASP inputs at runtime. Open the `Update Player Movement` function (it's called on **Tick**):
## Inputs
The next step is to properly update GASP inputs at runtime. Open the `Update Player Movement` function (it's called on **Tick**):
 Find some place at the end of the function, and set the value of the Gait property based on Movement State:
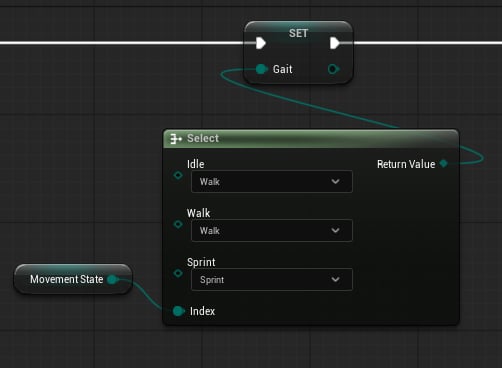 **Note**: `Gait` is from **GASP**, and `Movement State` is a **Tactical Shooter Pack** property.
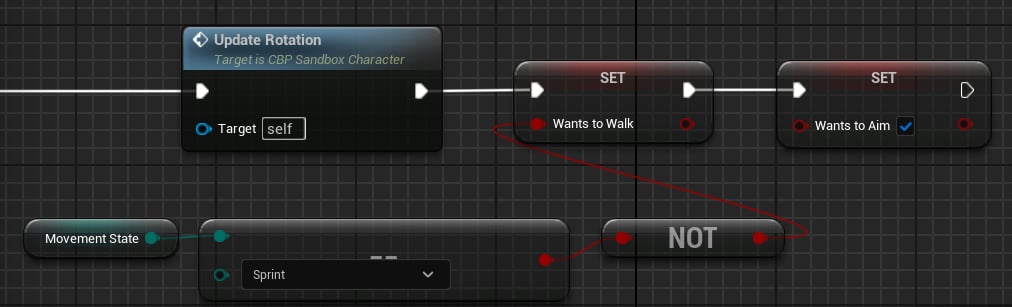
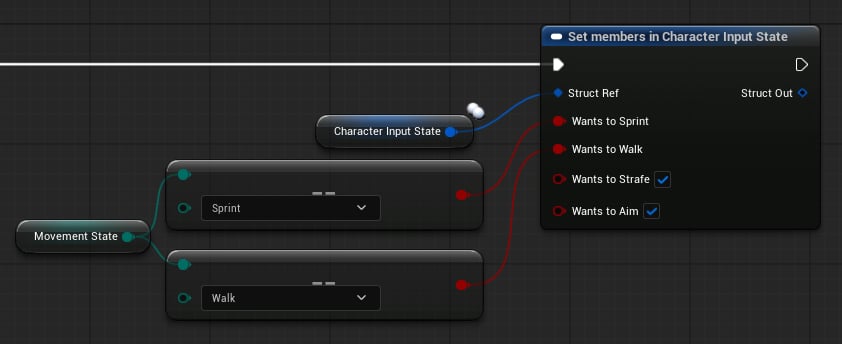
Then, we need to update `bWantsToSprint`, `bWantsToWalk`, `bWantsToAim` and `bWantsToStrafe` properties.
**Note:** The setup differs between **5.4** and **5.5/5.6**; refer to the images below.
**Note**: `Gait` is from **GASP**, and `Movement State` is a **Tactical Shooter Pack** property.
Then, we need to update `bWantsToSprint`, `bWantsToWalk`, `bWantsToAim` and `bWantsToStrafe` properties.
**Note:** The setup differs between **5.4** and **5.5/5.6**; refer to the images below.
 ## Animation blueprint
Now we need to create an animation blueprint (ABP) that will combine motion-matching pose and animations from the **Tactical Shooter Pack**.
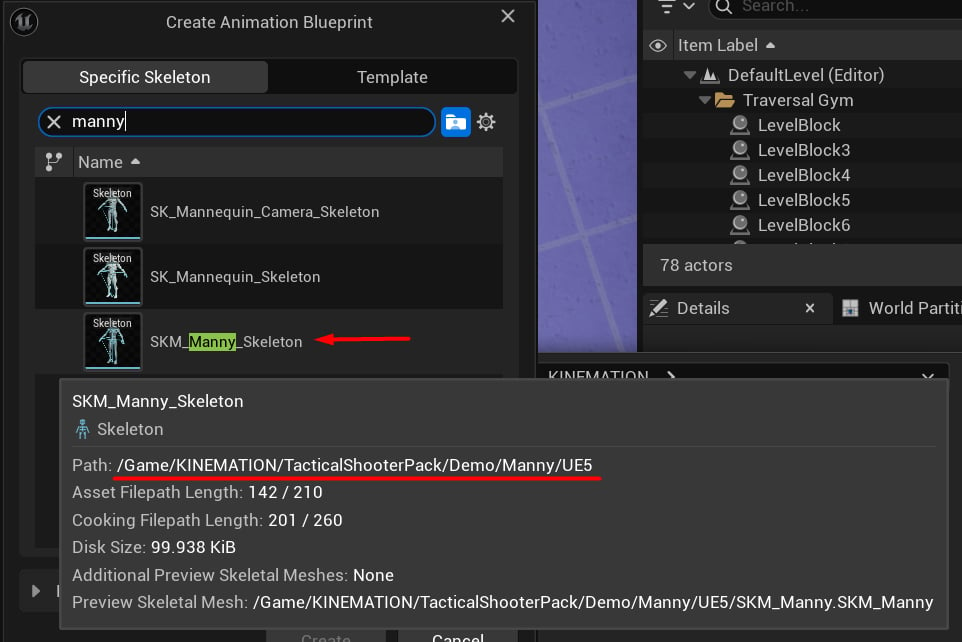
Create a new Animation Blueprint using the **UE5 Manny** skeleton from the pack:
## Animation blueprint
Now we need to create an animation blueprint (ABP) that will combine motion-matching pose and animations from the **Tactical Shooter Pack**.
Create a new Animation Blueprint using the **UE5 Manny** skeleton from the pack:
 Go to the Event Graph and use this snippet for initialization:
 **Tip**\*:\* Obtain a reference to your player Blueprint here.
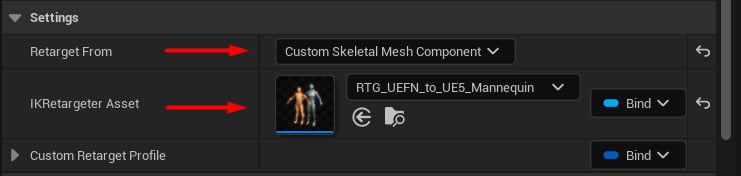
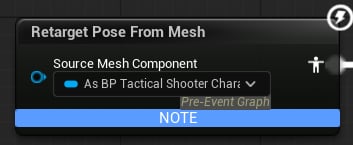
In the **Anim Graph**, add a **Retarget Pose From Mesh** node. Set the `Retarget From` to **Custom Skeletal Mesh Component**, and `IK Retargeter Asset` to **RTG\_UEFN\_to\_UE5\_Mannequin**:
**Tip**\*:\* Obtain a reference to your player Blueprint here.
In the **Anim Graph**, add a **Retarget Pose From Mesh** node. Set the `Retarget From` to **Custom Skeletal Mesh Component**, and `IK Retargeter Asset` to **RTG\_UEFN\_to\_UE5\_Mannequin**:
 After that, bind the `Source Mesh Component` using the "Mesh" property from the player blueprint.
 Next, add the ABP\_TacticalShooter\_UE5 linked anim instance and blend it with the retargeted pose:
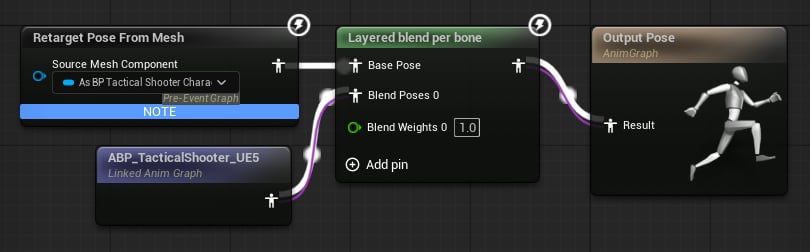
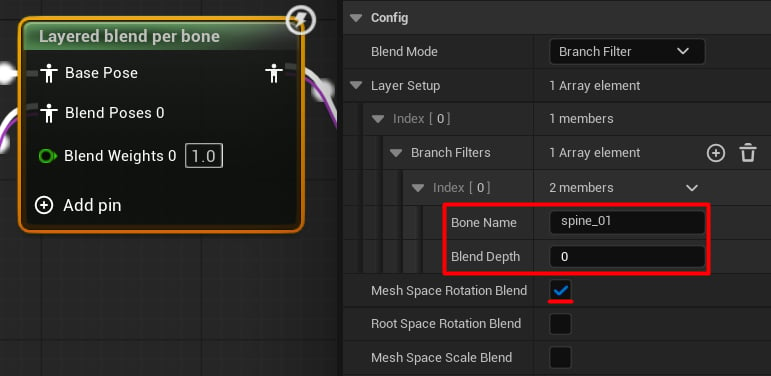 **Tip**: Feed the retargeted pose into **Base Pose**, and Tactical Shooter animations into **Blend Pose 0**.
## Parkour adjustments
To properly blend parkour animations, we need to adjust our layering. First, create 2 cached poses:
**Tip**: Feed the retargeted pose into **Base Pose**, and Tactical Shooter animations into **Blend Pose 0**.
## Parkour adjustments
To properly blend parkour animations, we need to adjust our layering. First, create 2 cached poses:
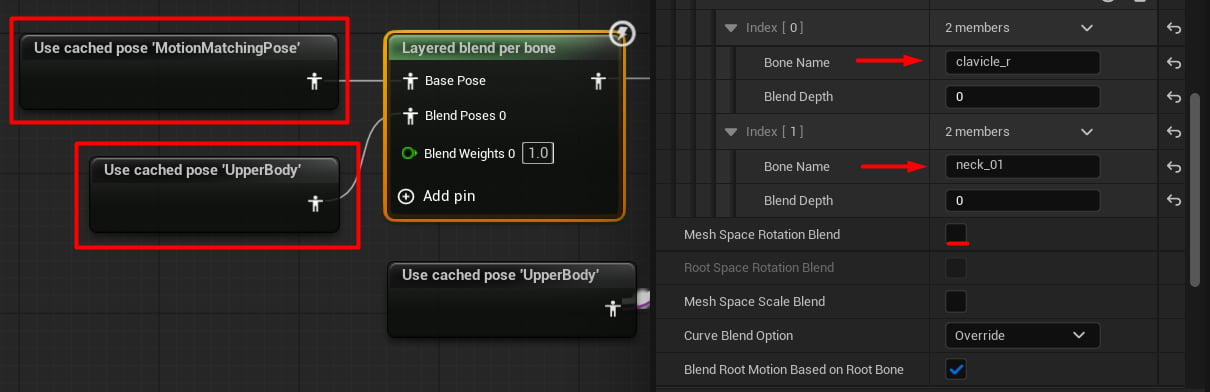
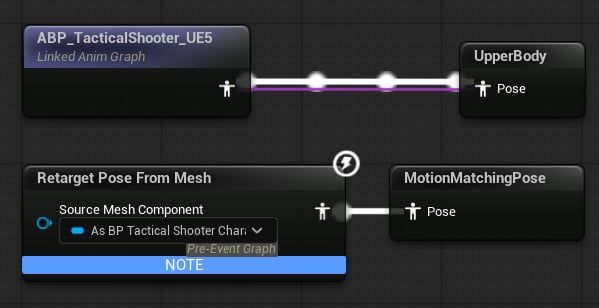 **UpperBody** carries Tactical Shooter animations; **MotionMatchingPose** carries full‑body motion.
Next, add a new **Layered Blend Per Bone** node:
**UpperBody** carries Tactical Shooter animations; **MotionMatchingPose** carries full‑body motion.
Next, add a new **Layered Blend Per Bone** node:
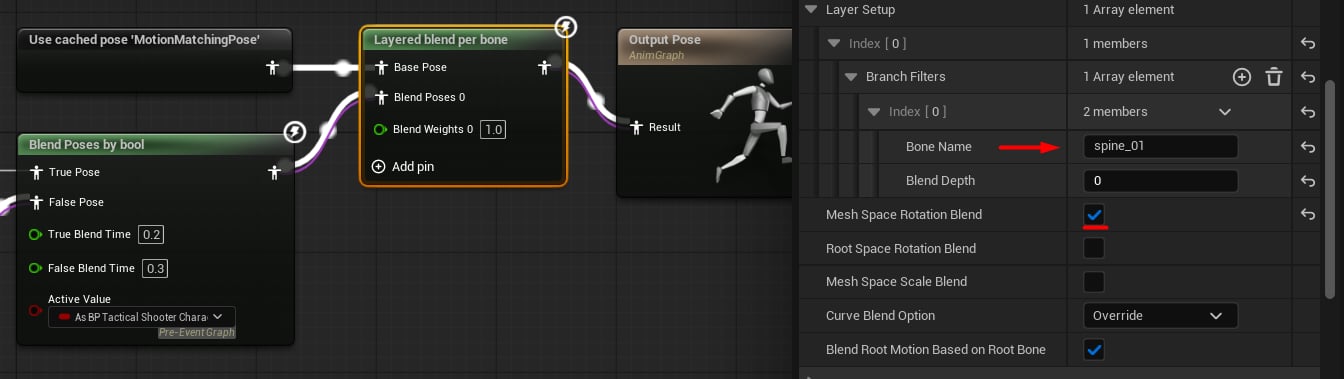
 Add a **Blend by Bool** node and plug the layered result into **True:**
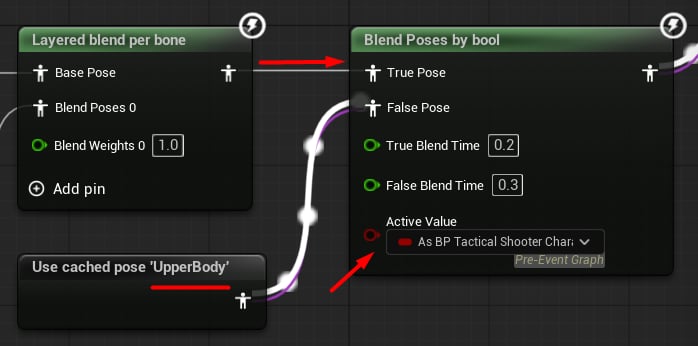 This will blend between parkour and normal poses using the `DoingTraversalAction` boolean from our character blueprint.
Finally, blend the result with the "MotionMatchingPose":
This will blend between parkour and normal poses using the `DoingTraversalAction` boolean from our character blueprint.
Finally, blend the result with the "MotionMatchingPose":