
Assets/KINEMATION/SurvivalPack/Prefabs/Player/P_SurvivalPackController.prefab. Use it to inspect the component settings or follow Character setup to configure your own model.
Overview
The example character usesSurvivalPackController to read input, move the character, and use the equipped item. GameplayControllerExample provides movement, camera input, item switching, aiming, and inspection. ShooterControllerExample adds reload and fire-mode controls.
GameplayAnimationController handles the animation. The example controller tells it how the character is moving and looking, and calls the equipped item’s example component when an action starts.
Character controller, input, and animation components on the example player.
Character components
Starting the character
InAwake, the example finds the animation controller, camera, collision controller, and Audio Source.
In Start, it reads Item Prefabs and creates each item below the mapped weapon bone. Each prefab needs a GameplayItemExample or derived component. The controller hides the created items, equips the first one, and waits for its draw animation.
The example also locks and hides the mouse cursor and sets a target frame rate of 120. These are example application settings that you can change in your own controller.
To add a weapon to this character, add its prefab to Item Prefabs before entering Play mode. Changing the list after initialization does not automatically rebuild the active items.
Movement settings
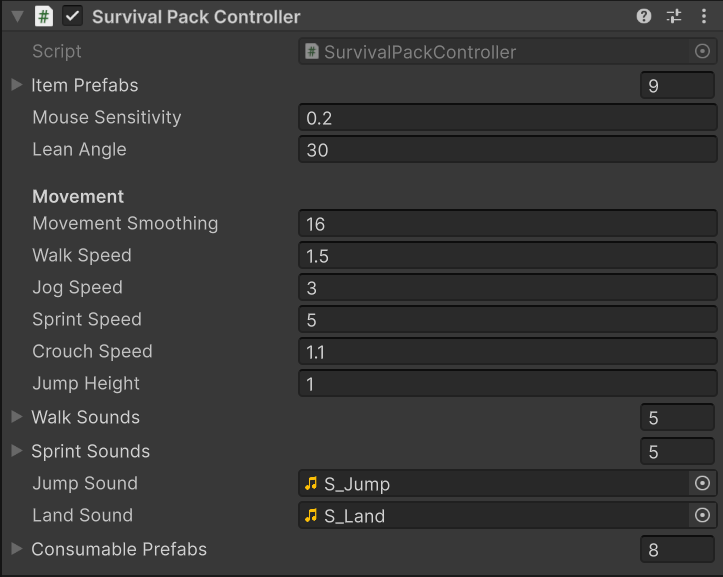
- Mouse Sensitivity scales mouse look input.
- Lean Angle sets the maximum requested lean in degrees.
- Movement Smoothing controls how quickly horizontal movement reaches the target speed.
- Walk Speed, Jog Speed, Sprint Speed, and Crouch Speed set movement speed in Unity units per second.
- Jump Height sets the height used to calculate jump velocity.
- Walk Sounds, Sprint Sounds, Jump Sound, and Land Sound contain character audio.
1, so diagonal movement does not increase input strength. It uses CharacterController.Move for movement and applies gravity in code.
Sprinting requires forward input and is blocked while aiming, crouching, or performing an active action. Crouching changes the capsule height and checks for space before standing. Jumping includes a short grace period after leaving the ground.
Locomotion parameters
The controller updates these Animator parameters:
The Transitions Animator layer handles standing and crouching transitions. Its weight decreases as Gait increases, so movement can take over from the stationary transition.
If you use a different locomotion controller, update the example’s parameter names and transitions to match it. The animation system can still layer weapon actions over your Animator.
Input actions
The pack uses thePlayer map in Assets/KINEMATION/SurvivalPack/Inputs_SurvivalPack.inputactions. PlayerInput uses Send Messages, so an action named Reload calls OnReload on the character GameObject.
Open the Input Actions asset to change bindings. Keep action names consistent with the callback names when using Send Messages. If you use C# events or Unity Events instead, connect the actions through your own input component.
Passing input to animation
OnMove writes moveInput on the animation controller. OnLook applies mouse sensitivity and writes deltaLookInput. During Update, the example rotates the character root from horizontal mouse movement, clamps vertical look to -90 through 90 degrees, and updates the camera pitch.
OnLean calculates a target lean angle, then Update smooths it into leanInput. OnAim updates the Animator, animation controller, and equipped item so the pose, sights, FOV, and recoil agree.
With a custom controller, keep these fields current. In particular, write the current look delta or zero each frame rather than leaving the previous movement in deltaLookInput.
Item actions
Firing and held use
Pressing UseItem callsUseItem on the active example component. A WeaponExample checks ammunition and fire timing before calling the view. A throwable begins its hold-and-release animation.
Releasing the button calls StopUsingItem. This stops automatic fire or finishes a held interaction such as charging or throwing.
Switching items
The controller callsUnEquipItem on the current item and waits for the returned holster duration. It then advances to the next item, calls EquipItem, and waits for the draw duration. The views control when the old item disappears and the new item becomes visible.
Reloading and inspection
ShooterControllerExample.OnReload gets the active WeaponExample and calls Reload. The weapon view chooses the appropriate animation. Inspection follows the same pattern through InspectItem.
The controller uses HasActiveAction to prevent overlapping reloads, switches, and inspections. A positive duration starts a timer. A duration of -1 means the action must finish explicitly; the shotgun uses this for its repeated shell-loading sequence.
Camera
The first-person camera follows First Person Socket onGameplayCamera. First Person Socket Offset adjusts its position relative to that transform. Camera Animation Source adds the animated camera-bone motion.
The example passes view pitch to the camera. Holding Free Look sends mouse movement to AddFreeLookInput instead of rotating the character. Releasing it returns the camera from free look.
Weapon views call UpdateTargetFOV when aiming and PlayCameraShake when firing. The camera also has standing, crouching, and aiming offsets for third-person use, shoulder selection, and collision settings.
Use your own controller
You can replace the example movement and input code while keeping the animation controller and item views.- Move your character and update the Animator parameters used by your locomotion.
- Update the animation controller’s movement, look, lean, and aim inputs.
- Attach the equipped item to the mapped weapon bone and run its equip initialization.
- Call the item’s use, stop-use, aim, reload, and holster methods when your gameplay allows them.
- Use the returned durations or your own action state to prevent incompatible actions.
IWeaponAmmo on the same GameObject as the view and manage shot timing in your weapon code. See Weapons for the weapon examples and Item View for animation calls.
Troubleshooting
- No input: check the active PlayerInput action map, Send Messages setting, action names, and controller component.
- No equipped weapon: check Item Prefabs, the prefab’s example component, and the mapped weapon bone.
- Reload never finishes: check the action duration and reload animation events. A shotgun reload needs ammo updates so its loop can reach capacity.
- Animation moves but the character does not: check the CharacterController and movement code; weapon animations do not move the collision capsule.
Survival equipment
SurvivalPackController derives from ShooterControllerExample. It adds a separate Consumable Prefabs list, mouse-wheel switching, and projectile controls. Configure both equipment lists before entering Play mode.
Use a consumable
Number keys send a one-based index toOnUseConsumable. The controller ignores the request during an active action or when that entry is missing.
- Holster the active regular item.
- Equip the selected consumable.
- Wait for
SurvivalConsumableExample.UnEquipDelay, calculated from its opening and use animations. - Holster the consumable.
- Reequip the previous regular item and wait for its draw animation.
UseConsumable() is the animation-event callback during this sequence. It forwards to SurvivalConsumableExample.Consume(), which advances the view’s visible consumption stage. It does not apply health or hunger changes.
Projectile callbacks
OnChangeProjectile calls ChangeProjectile() on an equipped view that implements ISurvivalProjectileWeapon. It ignores requests during an active action or consumable sequence.
The character animation event LaunchProjectile() calls the same interface’s launch method. Keep this callback on the GameObject receiving the character animation events when integrating another controller.
Add the example to your level
PlaceP_SurvivalPackController.prefab above a floor collider. Use its camera, disable other active player cameras and Audio Listeners, then enter Play mode. Test movement, switching, a projectile action, and a consumable sequence.