Start with a character that has been configured and retargeted. Test changes on one weapon before applying the same approach to the rest of the pack.

Gameplay Animation Controller

GameplayAnimationController is the shared animation entry point for . It combines the base animation pose, mapped skeleton, animation overrides, and active procedural asset.
Gameplay Animation Controller General tab in the Unity Inspector

Gameplay Animation Controller inputs and base animation settings.

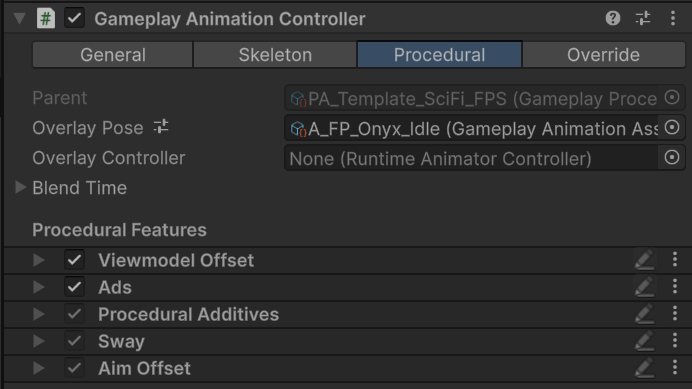
Gameplay Animation Controller Procedural tab asking for a procedural asset

Select the procedural asset from the General tab before editing features.

Procedural assets

A GameplayProceduralAsset defines a default idle pose, an optional overlay controller, blend timing, and an ordered list of features. The equipped GameplayItemView can provide a weapon-specific asset, so tune the profile assigned to the item you are testing.
Use the pencil action beside a feature to create a local feature override. The override inherits the parent asset and replaces only that feature. Use it for weapon-specific offsets without duplicating the complete procedural stack.
Create a local feature override action on a Gameplay Procedural Asset

Create a local override for one procedural feature.

Viewmodel Offset

Overview. Viewmodel Offset moves the weapon pivot, weapon bone, and right and left hand IK targets. Position values are authored in centimeters and converted to Unity units at runtime.
Viewmodel Offset feature with weapon and hand transform offsets

Viewmodel Offset settings.

Use cases. Use Weapon Pivot Offset for corrections around the weapon itself. Use Weapon Bone Offset for a whole-viewmodel correction in character space. Use the hand offsets only for small grip corrections after the weapon is aligned. Create a local override for each weapon that needs different values.

Aim Offset

Overview. Aim Offset distributes pitch, yaw, and roll across mapped bones. It can also rotate the model in place after the view exceeds Angle Threshold.
Aim Offset feature with pitch, yaw, roll, and turn-in-place settings

Aim Offset and turn-in-place settings.

Use cases. Leave a bone list empty to use the mapped spine chain automatically. Add explicit elements when a character needs a custom distribution. Keep the summed positive and negative limits near 90 degrees across the chain. Use turn in place for a visible full body; disable it for arms-only viewmodels or when your movement controller already rotates the character.

Shooter Core procedural features

Shooter Core adds weapon-specific ADS, additive movement, recoil, and sway to the Gameplay Framework procedural stack used by .

ADS

Overview. ShooterAdsFeature aligns the mapped weapon bone with an Aim Target. It reads the active WeaponView aim point and blends position and rotation independently.
Shooter ADS feature with aim target, blend, and speed settings

Shooter ADS settings.

Use cases. Set Aim Target to for the supplied first-person setup. Use Position Blend and Rotation Blend to decide how much of each axis uses absolute alignment. Raise Aiming Speed for faster transitions. Raise Aim Point Speed when switching sights or aim points should settle faster. Place the sight’s aim point transform on the weapon and assign it in WeaponView.

Procedural Additives

Overview. ShooterAdditiveFeature applies the weaponBoneAdditive motion and the output from RecoilAnimation to the mapped weapon bone. Separate idle and walk scales are available for hip fire and ADS.
Shooter Procedural Additives feature with idle, walk, and aiming scales

Shooter Procedural Additives settings.

Use cases. Use Space Offset when the additive bone was authored in a different axis convention. Start with 1 for hip-fire idle and walk to preserve the authored motion. Reduce the ADS values when sight alignment must stay stable; the supplied profile uses approximately 0.1 idle and 0.2 walk. Keep a nonzero value when you still want breathing or movement while aiming.

Sway

Overview. ShooterSwayFeature applies spring-based movement sway from move input and aiming sway from look delta. Each block has position and rotation springs, clamps, damping, application space, and an ADS scale.
Shooter Sway feature with aiming and movement spring settings

Shooter Sway settings.

Use cases. Tune Scale for amplitude, Speed for response, Stiffness for return force, and Damping to remove oscillation. Use clamps to prevent extreme mouse or movement input from displacing the weapon too far. Use component space for predictable first-person motion. Lower ADS Scale to keep sights readable while aiming; 0.5 is a practical starting point.
Tune one feature at a time. Temporarily set the other feature weights to 0, validate the result in hip fire and ADS, then restore the complete stack.

Animation curve properties

Gameplay curves control how locomotion and overlay animation combine on each body group. Select an animation clip, then choose Assets > Edit Gameplay Curve Properties. The editor exposes lower body, spine, neck, arms, fingers, and weapon properties. Use + to add a constant curve and - to remove it. Right-click a value to switch between a constant value and an animated curve. Save the clip after each group of changes. These are starting points based on the supplied and clips. Tune them after you preview your own locomotion and target rig. For a pure first-person controller, let the overlay own the spine and arms. This keeps the weapon pose close to the authored animation. For a hybrid controller, preserve the arm local pose while the visible body follows locomotion. This reduces arm drift when the same character must read from first- and third-person cameras.
Do not copy one profile across every action without previewing it. Reloads, sprint poses, and throwable animations may need different layer weights or an animated transition curve.

Adjustment order

1

Fix the reference pose and curves

Confirm that the baked clip has the correct body-layer weights before compensating with procedural offsets.
2

Align the viewmodel

Tune Viewmodel Offset, then create local overrides for weapons that need unique grips.
3

Configure ADS

Assign the weapon aim point and tune the ADS blend and transition speeds.
4

Add motion

Tune additives, recoil, sway, and Aim Offset in that order. Validate hip fire, ADS, locomotion, reload, and turn-in-place after each change.
The setup is complete when the weapon aligns in ADS, both hands keep their grips, locomotion does not pull the upper body away from the weapon, and the same settings remain stable at your first- and third-person camera distances.