
Project Download (UE 5.7 only)
Follow these steps to download and install the Unreal Engine 5.7 integration project.1
Download the project
TacticalShooterPack_Integration_GASP.zipGoogle Docs
2
Import the Tactical Shooter Pack
Select the project you just downloaded, then add the pack content to it.
Tip: For manual installation, copy the “KINEMATION” folder from the Tactical Shooter Pack download and paste it into the downloaded integration package.
Character Meshes
Base Blueprint
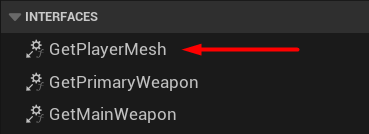
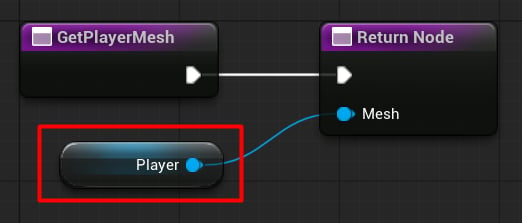
First, we need to create a base for our integration. Duplicate the BP_TacticalShooterCharacter (KINEMATION/TacticalShooterPack/Blueprints): This will be our main player blueprint. Open it up, go to Class Settings and inherit it from the SandboxCharacter_CMC: Now we need to add a skeletal mesh for our character model. Let’s call it “Player”: Next, assign the modular skeletal mesh — we’ll use our modular Operator model: Find theGetPlayerMesh interface function and return the new “Player” skeletal mesh component:
Motion Matching Mesh
Select the “Mesh” component and set its animation blueprint to SandboxCharacter_CMC_ABP and skeletal mesh to SKM_UEFN_Mannequin:Note: The “Mesh” skeletal component will generate a motion-matching pose (full-body movement), which will be blended with our tactical animations.
First Person Camera
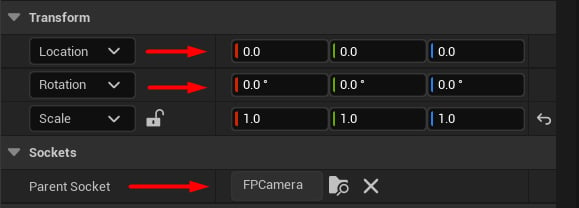
Parent the Camera component to the Player mesh we created earlier: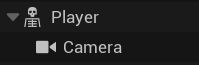
Disabling GASP Cameras & Mesh
To disable GASP camera logic and hide the default mesh, we need to add a couple of code snippets at the end of the Begin Play event. To hide the default Sandbox mesh, add these nodes to the graph: To disable the default camera logic, use this code snippet Here’s a video showing where to put this logic in the player blueprint:Inputs
The next step is to properly update GASP inputs at runtime. Open theUpdate Player Movement function (it’s called on Tick):
Find some place at the end of the function, and set the value of the Gait property based on Movement State:
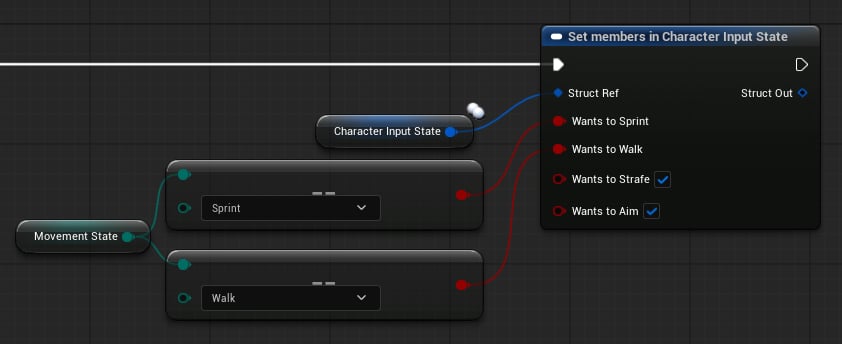
Then, we need to update bWantsToSprint, bWantsToWalk, bWantsToAim and bWantsToStrafe properties.
Animation Blueprint
Now we need to create an animation blueprint (ABP) that will combine motion-matching pose and animations from the Tactical Shooter Pack. Create a new Animation Blueprint using the UE5 Manny skeleton from the pack: Go to the Event Graph and use this snippet for initialization: In the Anim Graph, add a Retarget Pose From Mesh node. Set theRetarget From to Custom Skeletal Mesh Component, and IK Retargeter Asset to RTG_UEFN_to_UE5_Mannequin:
After that, bind the Source Mesh Component using the “Mesh” property from the player blueprint.
Next, add the ABP_TacticalShooter_UE5 linked anim instance and blend it with the retargeted pose:
Tip: Feed the retargeted pose into Base Pose, and Tactical Shooter animations into Blend Pose 0.
Parkour adjustments
Copy the jumping logic fromSandboxCharacter_CMC:
Next, we need to adjust our layering in the animation blueprint. First, create 2 cached poses:
UpperBody carries Tactical Shooter animations; MotionMatchingPose carries full‑body motion.
Next, add a new Layered Blend Per Bone node:
Add a Blend by Bool node and plug the layered result into True link:
Right-click on the “Active Value” and bind “BP_TacticalShooterCharacter_GASP▸AC_TraversalLogic ▸ DoingTraversalAction”.
Finally, blend the result with the “MotionMatchingPose”: