
AC_TacticalAttachmentComponent manages the attachments on a weapon. It stores the available classes, spawns them when the weapon starts, and handles switching between them.
You can find the attachment Blueprints in Content/KINEMATION/TacticalShooterPack/Blueprints/Attachments. The component is already included in BP_TacticalShooterWeapon, so weapons derived from this class inherit it.
Attachment groups
The system uses four attachment groups. Each group keeps its own selection, so changing a grip does not change the muzzle attachment or optic.Add an attachment
Create the attachment Blueprint
- Create a child Blueprint of the matching base class from the table above. You can also duplicate an existing attachment, such as
BP_VerticalGrip,BP_MCS_Suppressor, orBP_Flashlight_LS3. - Assign your mesh to the attachment’s mesh component. The base grip, muzzle, and optics Blueprints already include one. For an attachment based directly on
BP_WeaponAttachment, add your own mesh component. - In Class Defaults, set Socket to the mount socket on the weapon. Set Attachment Name to the name you want to use for the attachment.
- Keep collision disabled on the attachment mesh, as in the included examples.
- Compile and save the Blueprint.
Add it to a weapon
- Open your weapon Blueprint, for example
BP_TR15. - Select AC_TacticalAttachmentComponent in the Components panel.
- Add an entry to the appropriate attachment list.
- Set Attachment Class to your new Blueprint.
- Start with an identity Offset: zero location and rotation, and a scale of one. Adjust it if the attachment needs a different position on this weapon.
- Compile and save the weapon Blueprint.
- Test the weapon in Play mode. Cycle through the group to check the new entry.
F_AttachmentData, which contains Attachment Class and Offset. Optics use F_ScopeAttachmentData: expand Main Scope to set its Attachment Class and Offset.
The list order is the cycling order, and index 0 is the initial selection. After initialization, the first entry is selected when you equip the weapon.
To include an option with no attachment, add an entry with Attachment Class set to None. The group keeps this entry without spawning an actor. For optics, leave Main Scope ▸ Attachment Class empty and keep Secondary Scopes empty for that entry.
Add secondary sights
An optic entry can contain additional sights, such as a red dot mounted above the main scope.- Expand the entry in Scope Attachments and configure Main Scope.
- Add an entry to Secondary Scopes.
- Set Optics Class to a Blueprint derived from
BP_OpticsAttachment. - Choose Socket Type: Upper Rail or Lower Rail.
- Add the corresponding
UpperRailSocketorLowerRailSocketto the main optic’s mesh and adjust its transform.
2 switches the whole optics setup. Cycle Scope on Scope Group switches the aiming reference between the main optic and its secondary sights.
Sockets and offsets
Weapon mount sockets
The attachment’s Socket property names a socket onWeaponMesh. Add this socket in the weapon’s Skeletal Mesh Editor, parent it to the appropriate bone, and position it where the attachment should mount.
Spawn Attachment creates the attachment actor with the weapon as its owner, then attaches it to WeaponMesh using that socket. Location and rotation use Snap to Target; scale uses Keep Relative.
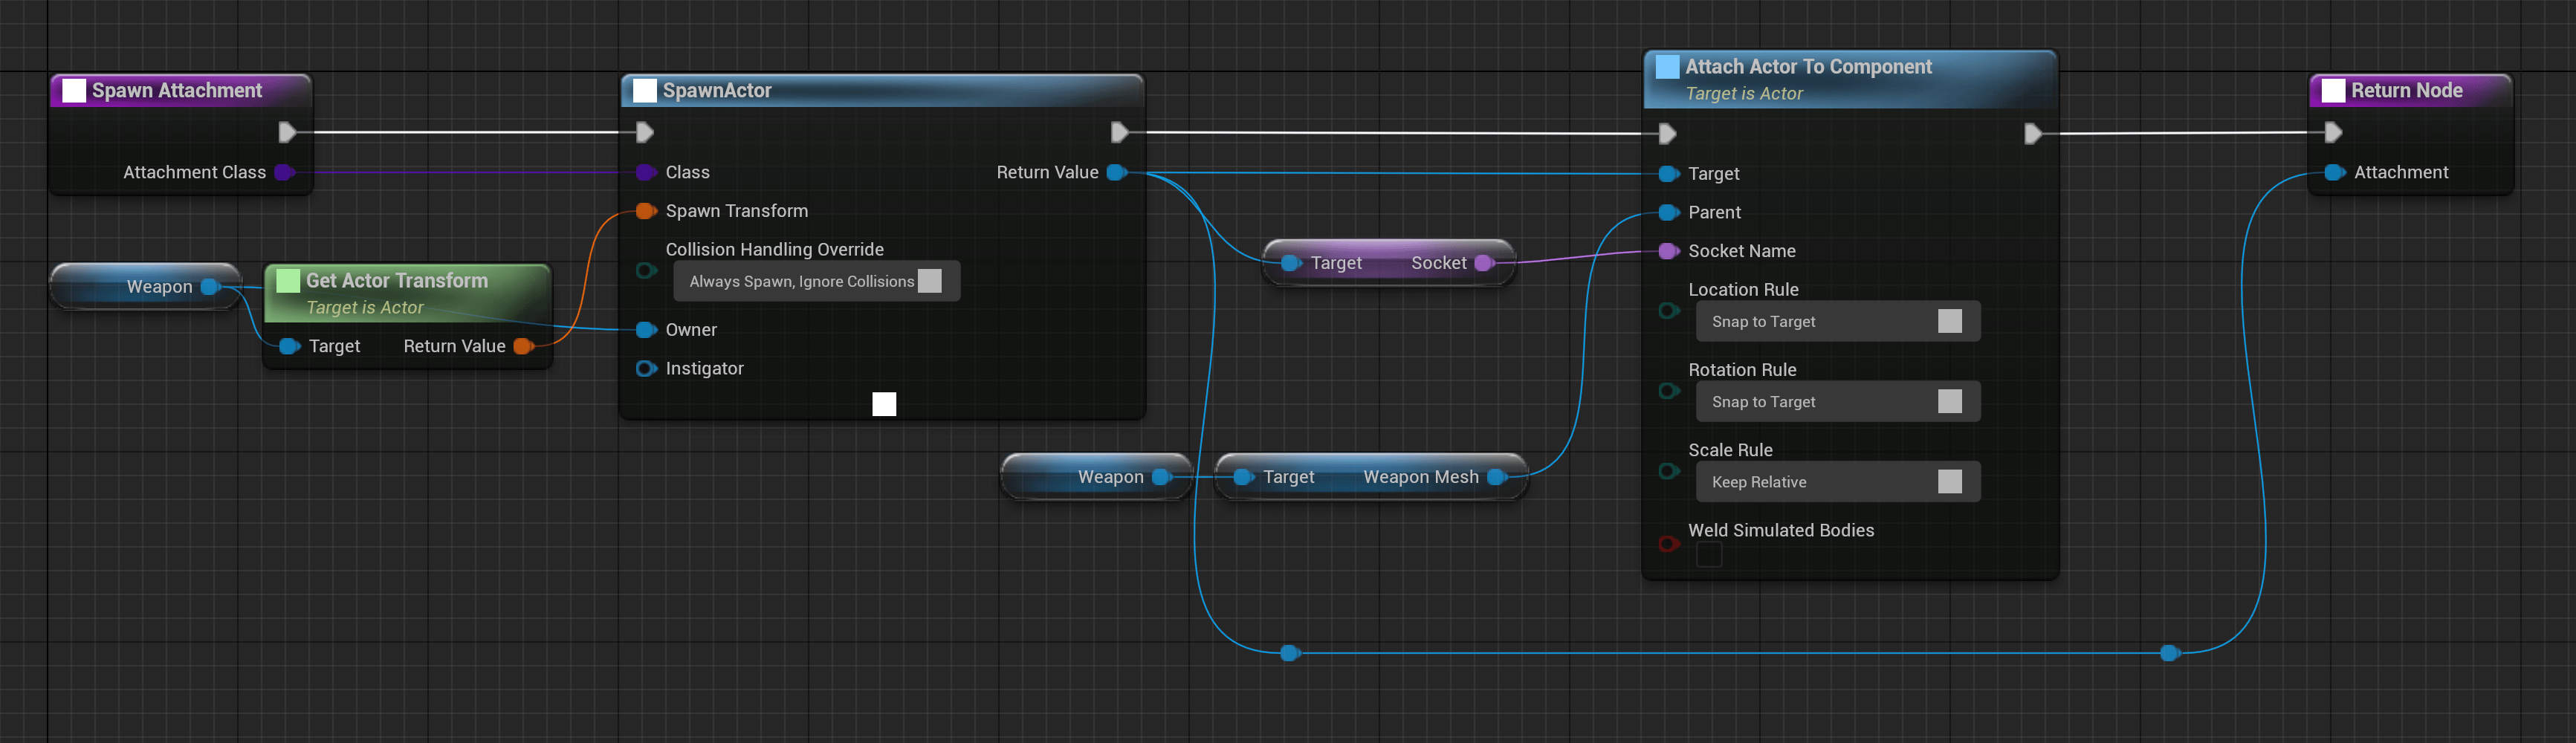
AC_TacticalAttachmentComponent ▸ Spawn Attachment
Sockets on the attachment mesh
Attachments can also have their own sockets:
The weapon’s
GripSocket mounts the grip actor. The GripSocket on the grip mesh defines the hand placement. These are separate sockets on separate meshes.
For optics, Get Attachment Mesh returns the component used to read these sockets. The base implementation returns OpticsMesh. If your optic uses another component, override this function to return it. BP_Optics_DMCO, for example, returns its Skeletal Mesh component.
Get Secondary Optic Socket Transform reads the selected rail socket in world space and converts it into a transform relative to the main optic actor.
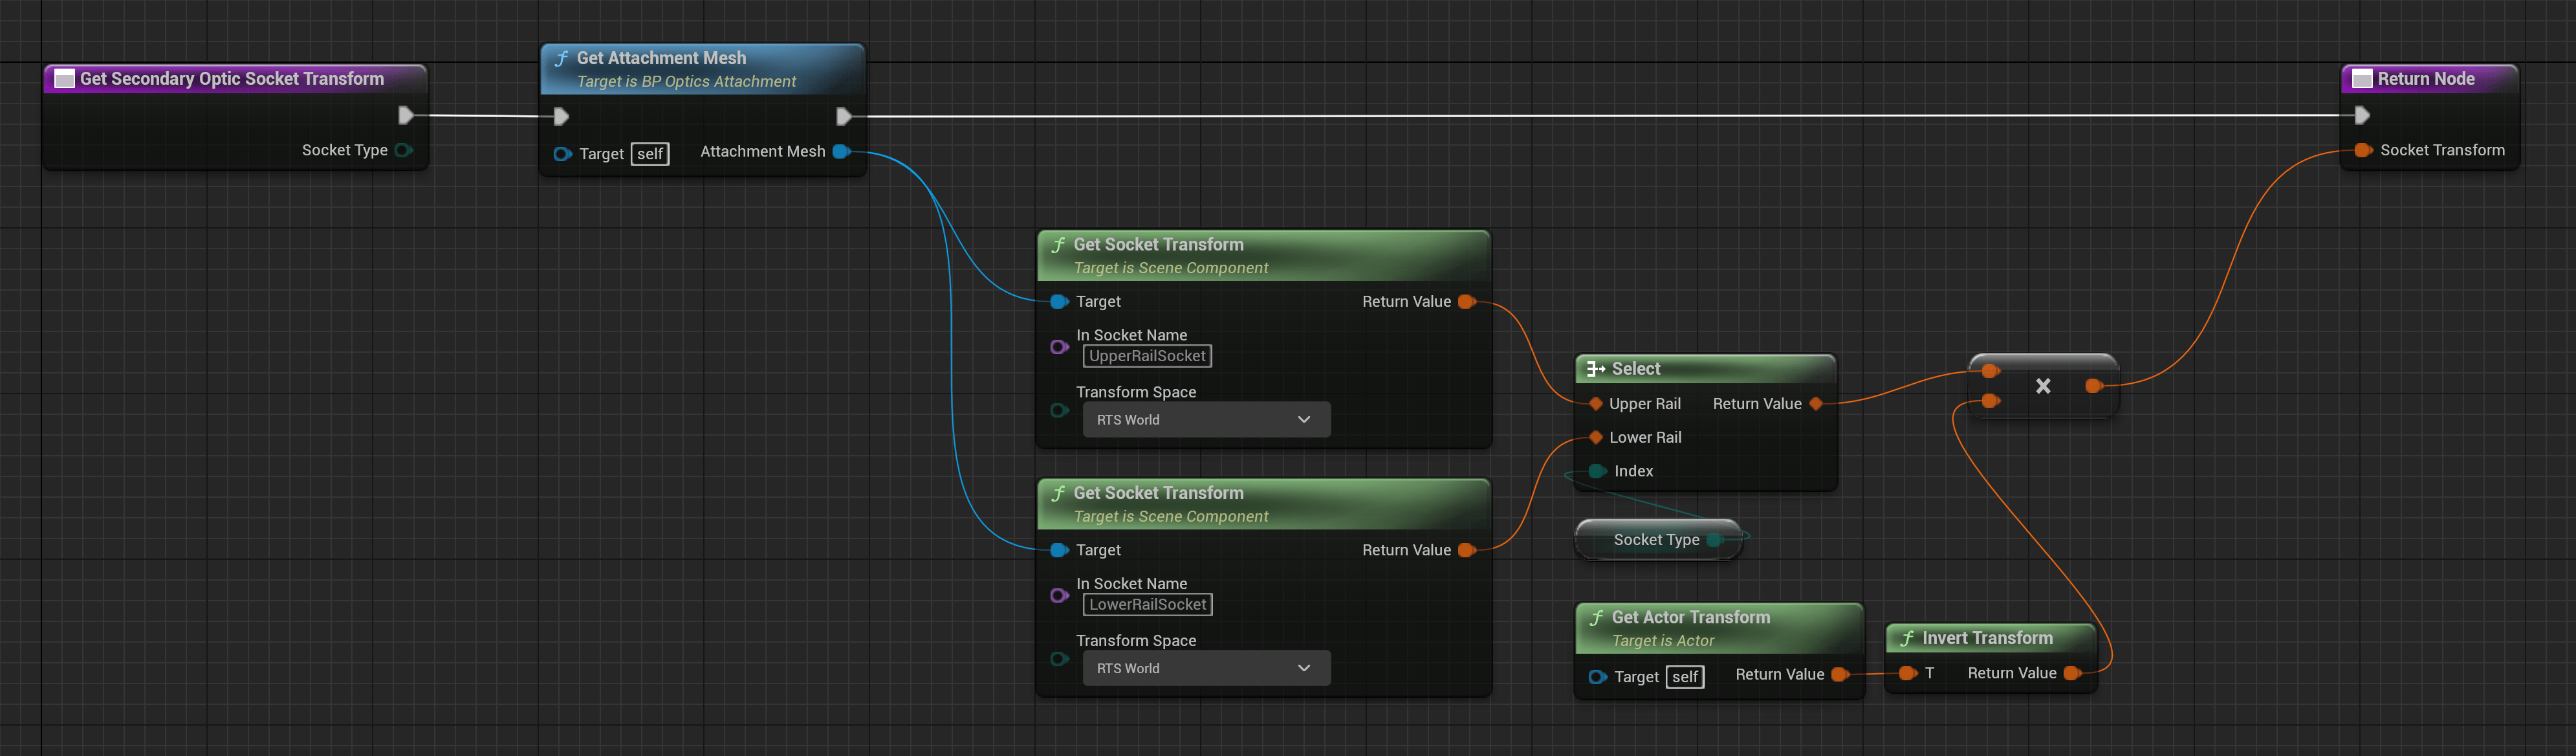
BP_OpticsAttachment ▸ Get Secondary Optic Socket Transform
Initialization and visibility
BP_TacticalShooterWeapon calls Initialize Attachment Component from BeginPlay. The component gets its owning weapon, constructs the muzzle, grip, underbarrel, and scope group objects, and initializes them from its attachment lists.
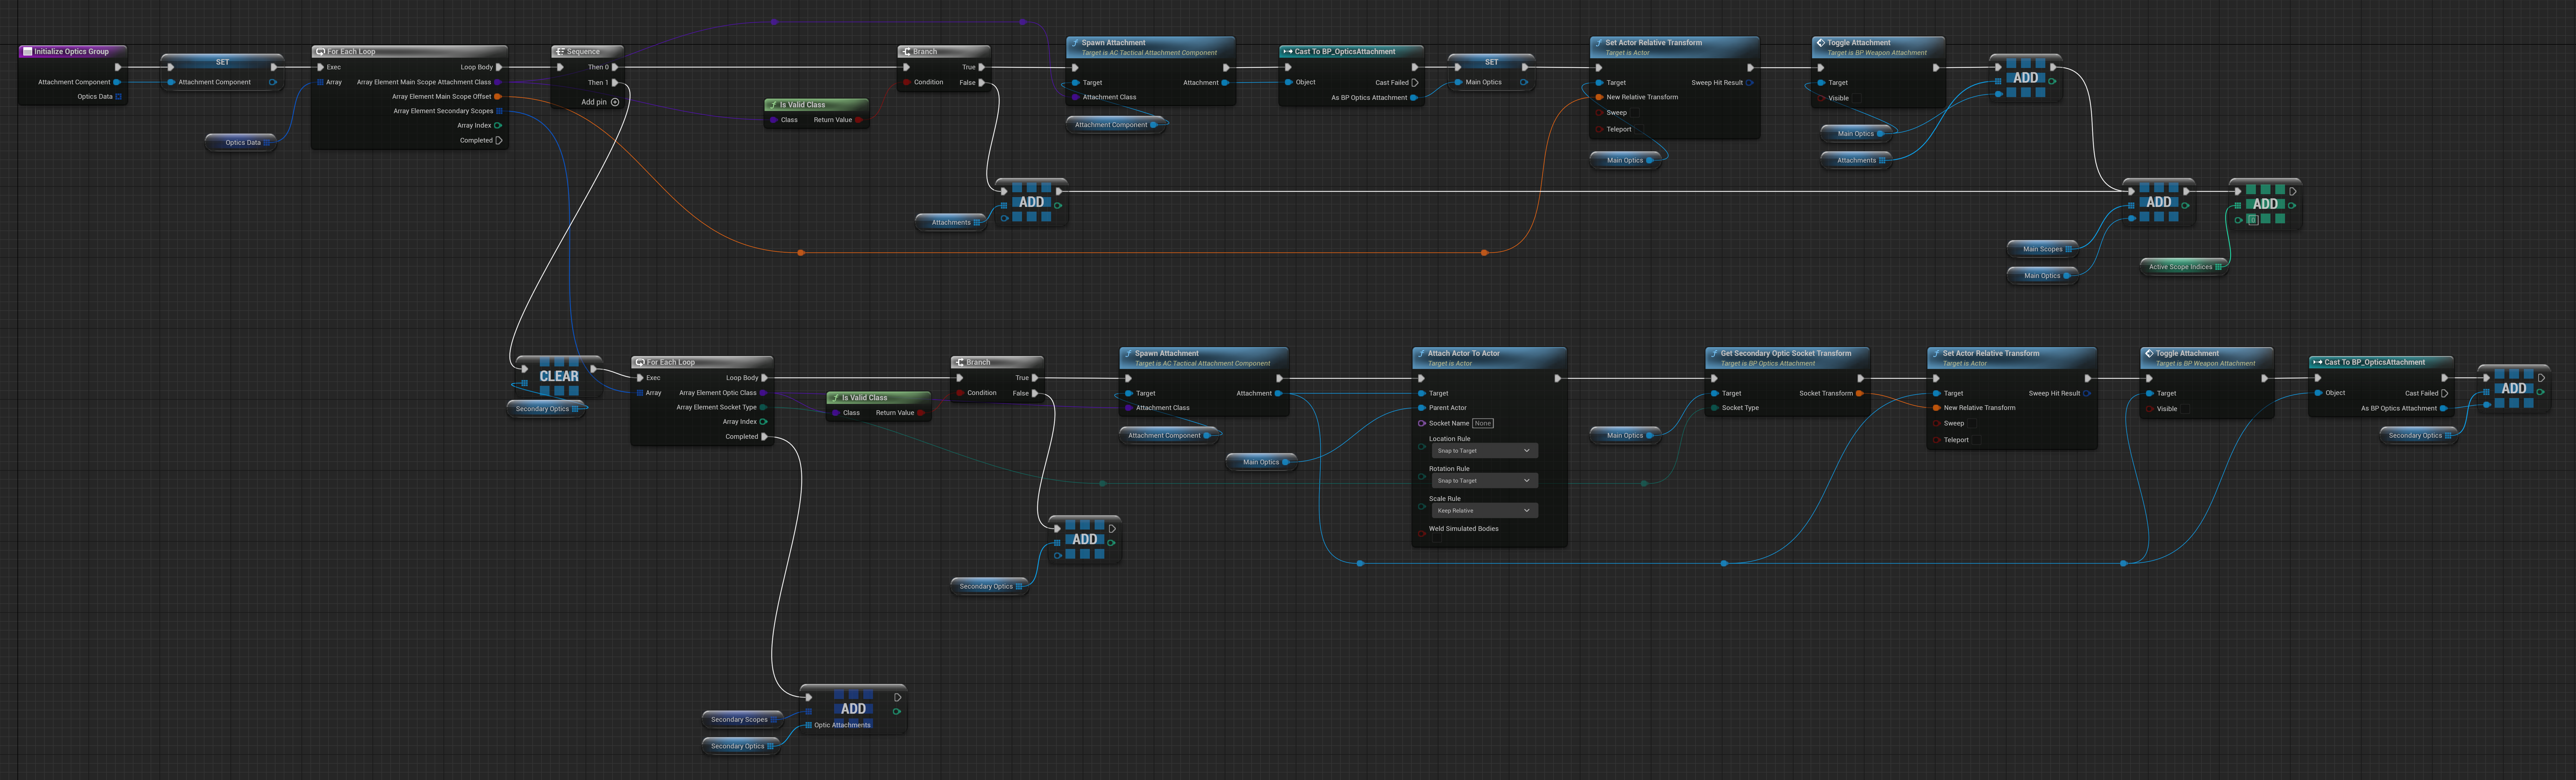
BP_AttachmentGroup uses Initialize Group to loop through the list. For each valid class, it spawns the attachment, applies its offset, hides it, and stores the actor reference. An empty class adds an empty reference instead, preserving the list order.

BP_AttachmentGroup ▸ Initialize Group

Cycle attachments
Cycle Attachments onAC_TacticalAttachmentComponent takes an Attachment Slot and forwards the call to the matching group. Use the slot numbers in the attachment groups table.
The group hides its current attachment, advances Active Attachment Index, and shows the actor at the new index if it is valid. After the last entry, the index returns to zero. Selecting an empty entry leaves the group without a visible attachment.
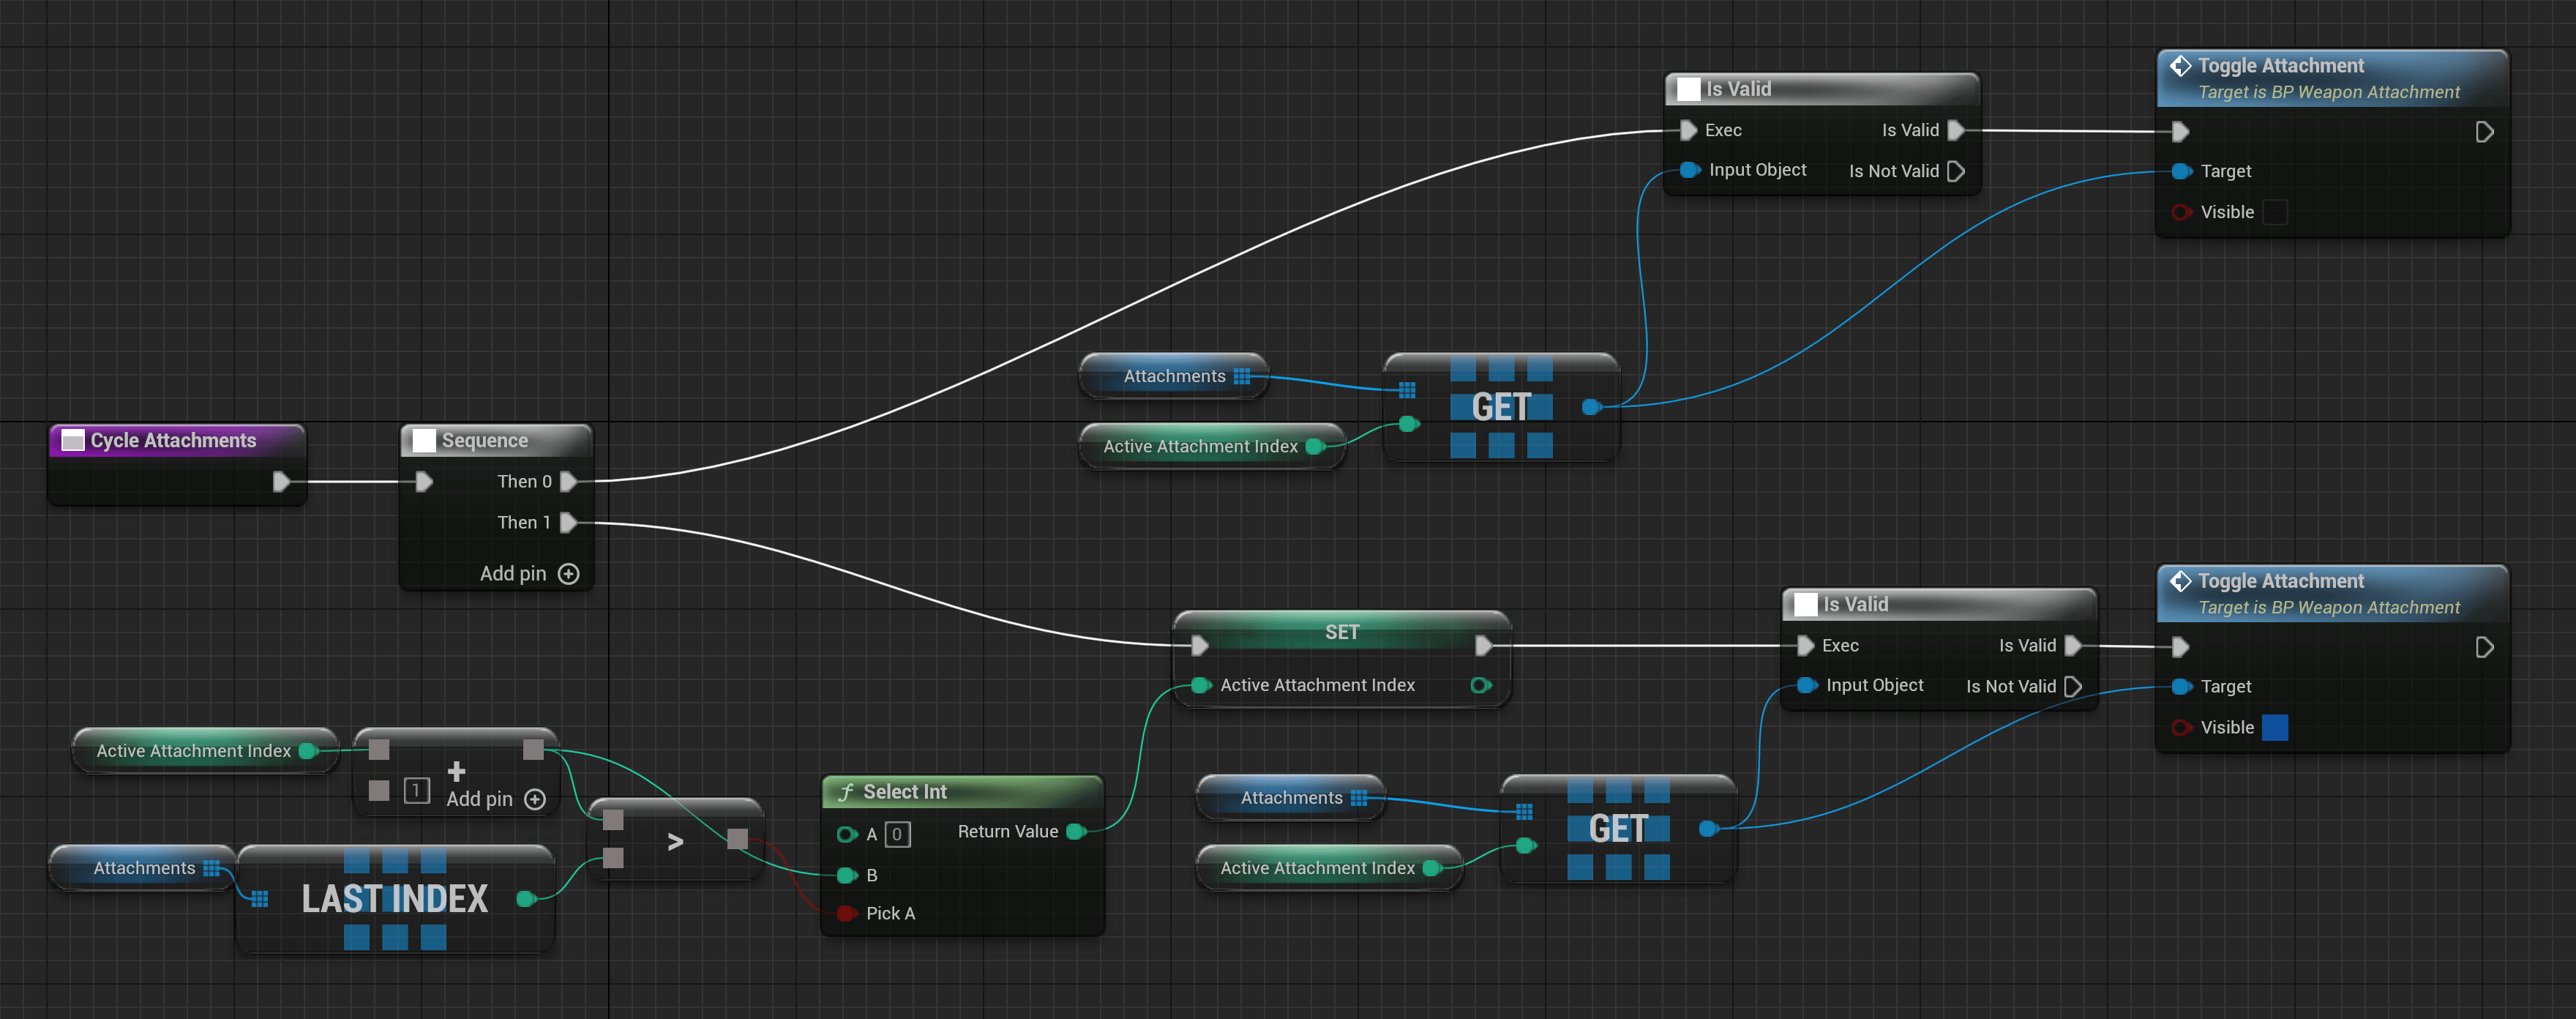
BP_AttachmentGroup ▸ Cycle Attachments
BP_ScopeAttachmentGroup extends this behavior to manage the secondary sights belonging to the selected main optic. Its Get Active Scope function returns the sight currently used for aiming.
Optics and aiming
Get Aim Point onBP_OpticsAttachment reads the AimPoint socket from Get Attachment Mesh. It keeps the socket’s rotation and offsets its position by Aim Distance along the negative right vector of the owning weapon.
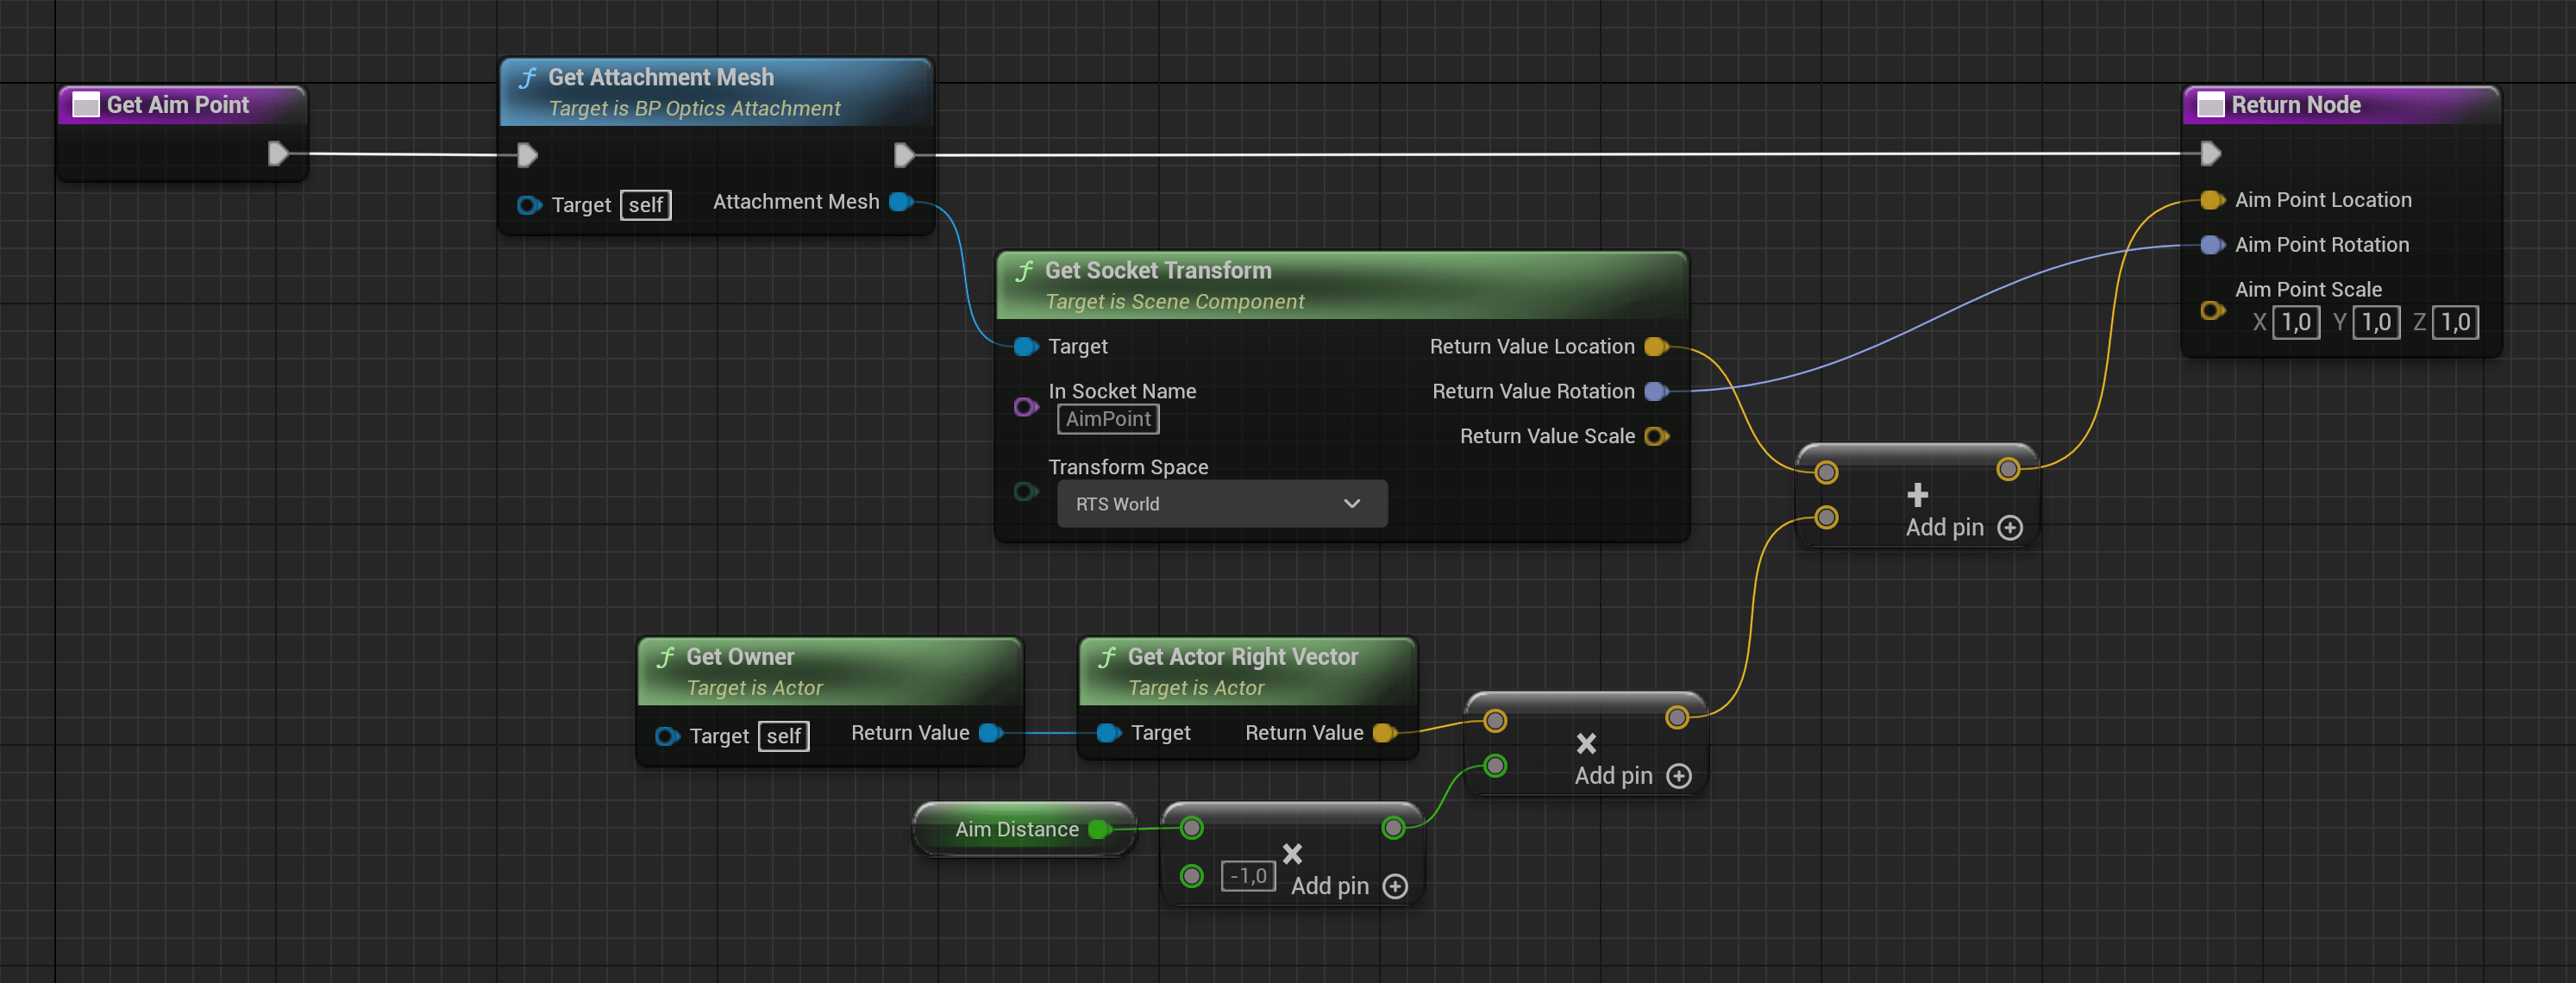
BP_OpticsAttachment ▸ Get Aim Point
AimPoint on WeaponMesh. It then interpolates the stored Aim Point towards the new target, so changing sights blends between their aiming positions.
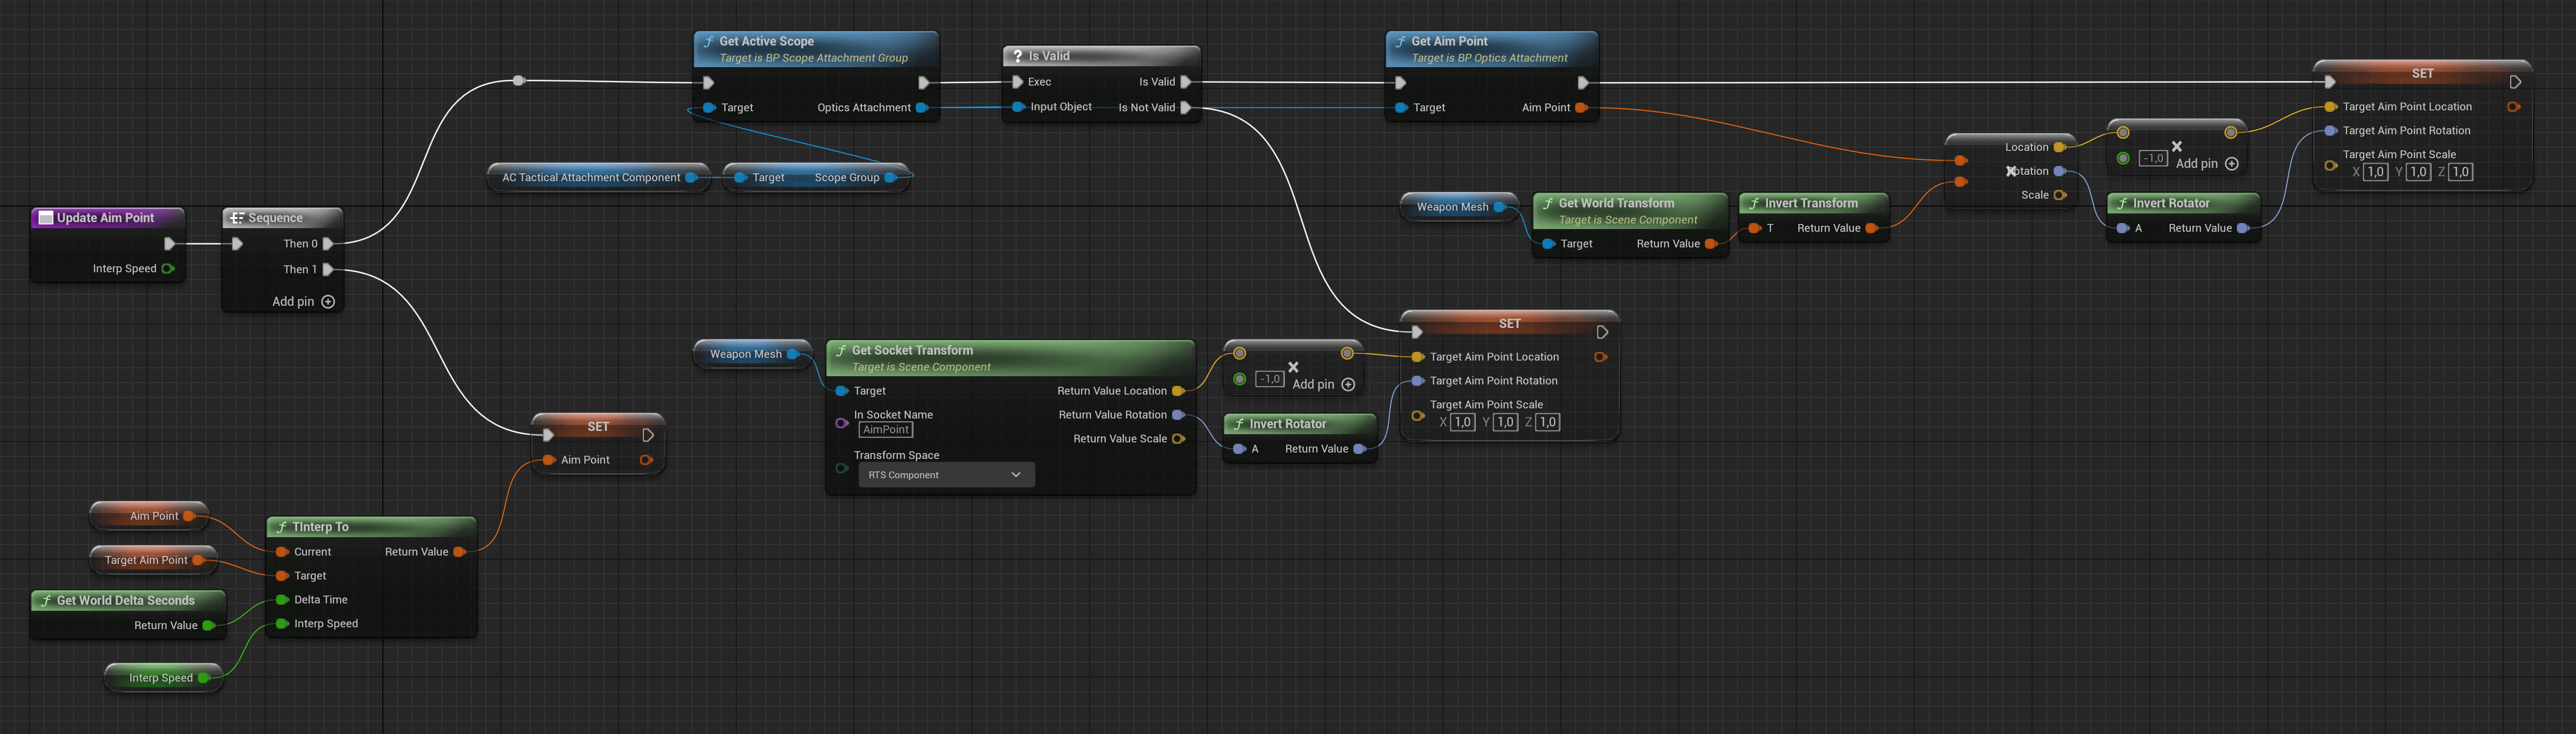
BP_TacticalShooterWeapon ▸ Update Aim Point
Grips and hand placement
BP_GripAttachment implements BPI_GripAttachment. Its Get Grip Pose function returns an F_GripPose containing:
- Pose: Grip Pose for UE5 or Grip Pose UE4 for UE4, selected from the weapon’s Use UE5 setting.
- Offset: The grip mesh’s
GripSockettransform relative to the owning weapon actor.
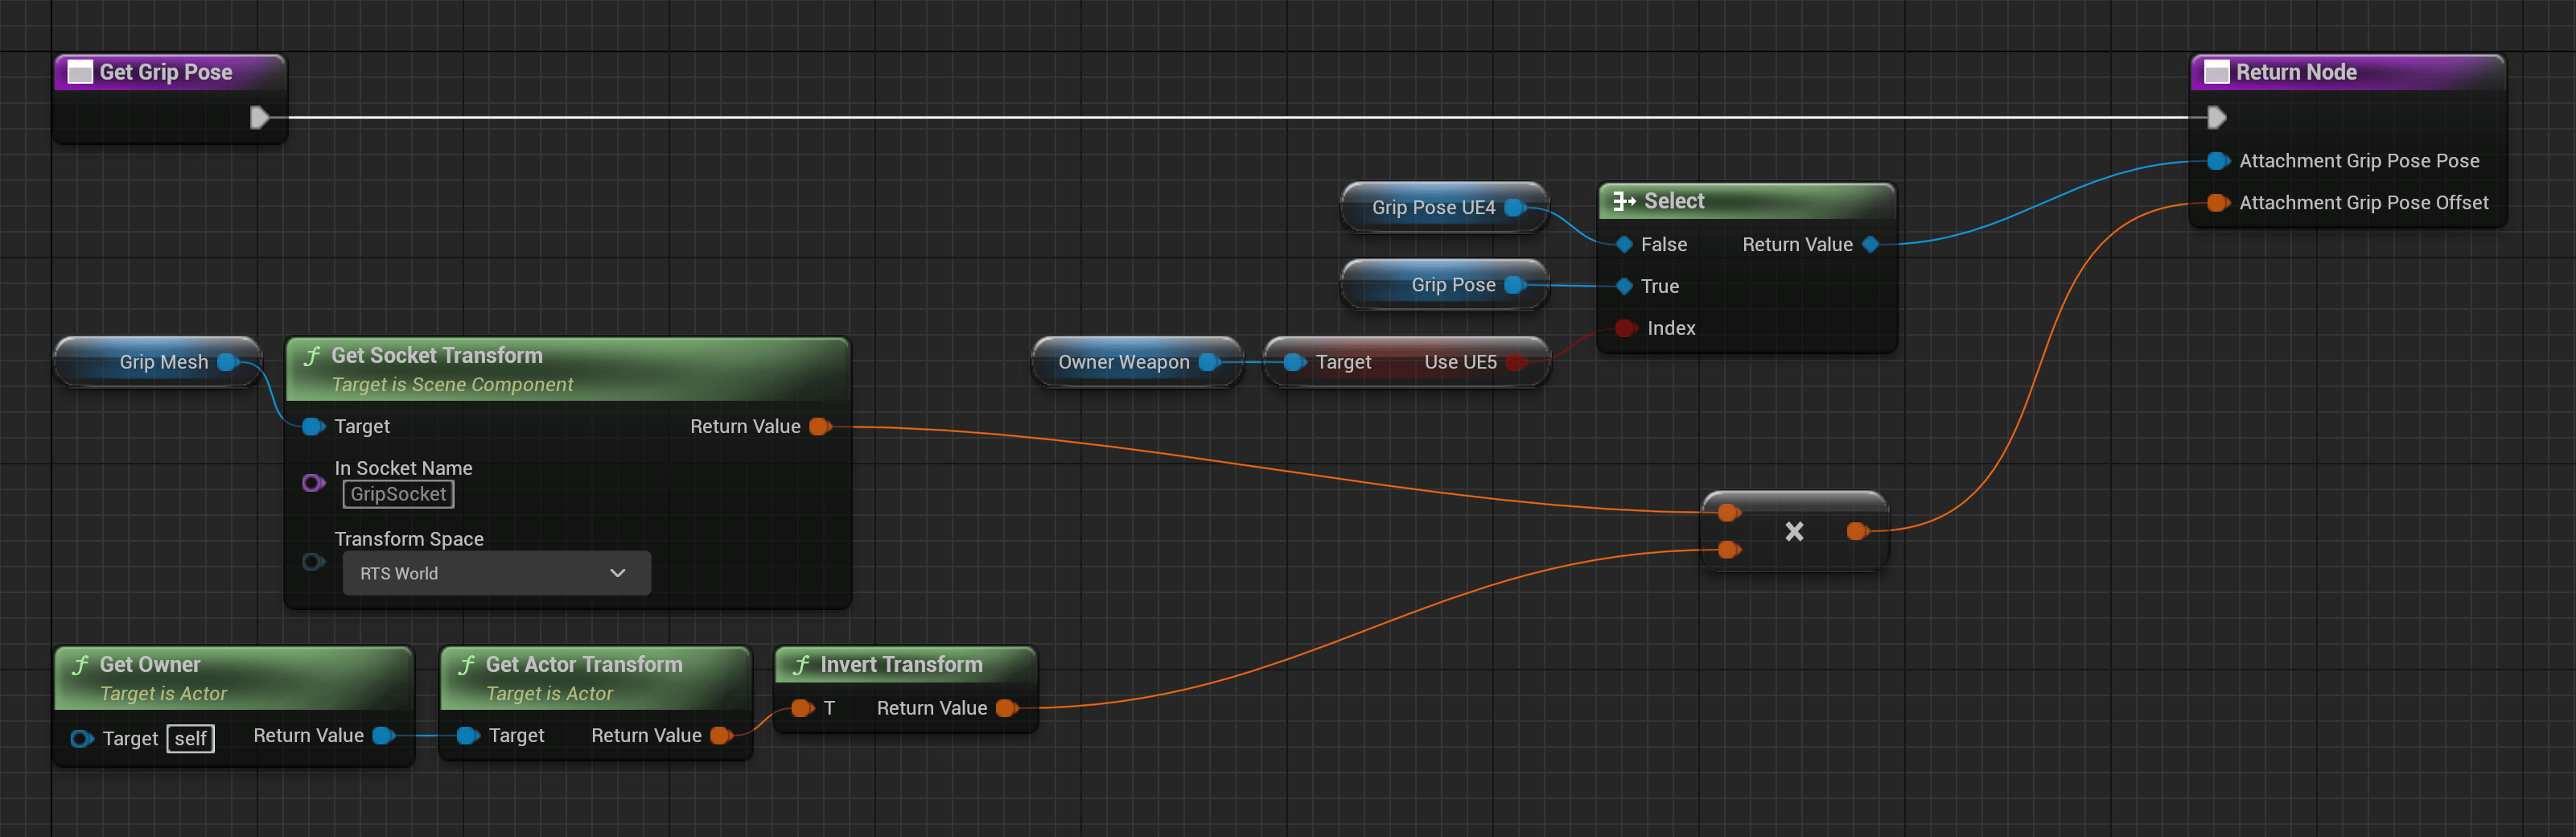
BP_GripAttachment ▸ Get Grip Pose
GripSocket to the grip mesh. The weapon forwards Get Grip Pose to the active grip through the interface. The pose Animation Blueprint reads this data to position the hand. When no valid grip pose is returned, it uses the weapon’s idle pose.
Muzzle attachments and suppressors
Suppressor behavior uses Is Suppressor onBPI_MuzzleAttachment. BP_MCS_Suppressor implements this function and returns true.
When firing, Play Fire Effects on BP_TacticalShooterWeapon queries the active muzzle attachment. The result selects Fire Suppressed or Fire Unsuppressed, together with the matching muzzle flash configuration and Niagara parameters.
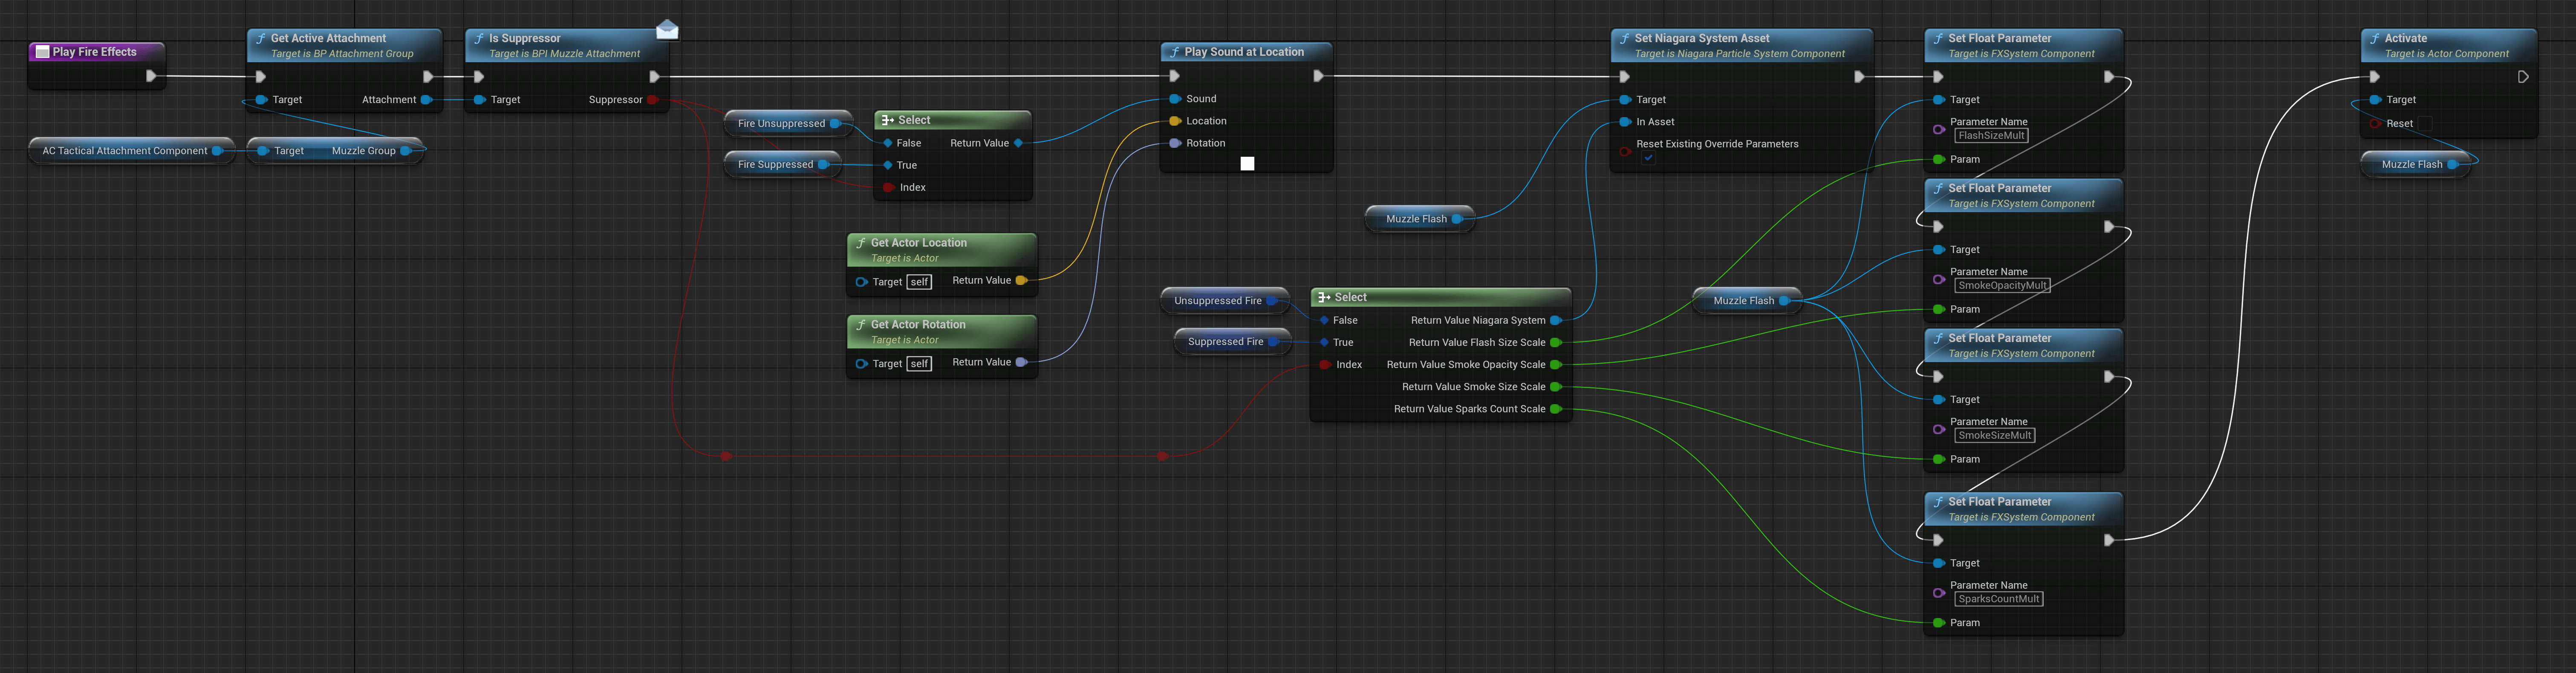
BP_TacticalShooterWeapon ▸ Play Fire Effects
BP_MCS_Suppressor, or implement BPI_MuzzleAttachment and return true from Is Suppressor. Assign the suppressed sound and effects on the weapon Blueprint.
Use attachments and toggle flashlights
Use Attachment performs the selected attachment’s action. On the component, it gets the requested group, checks its active attachment, and calls that actor’s Use Attachment function.
AC_TacticalAttachmentComponent ▸ Use Attachment
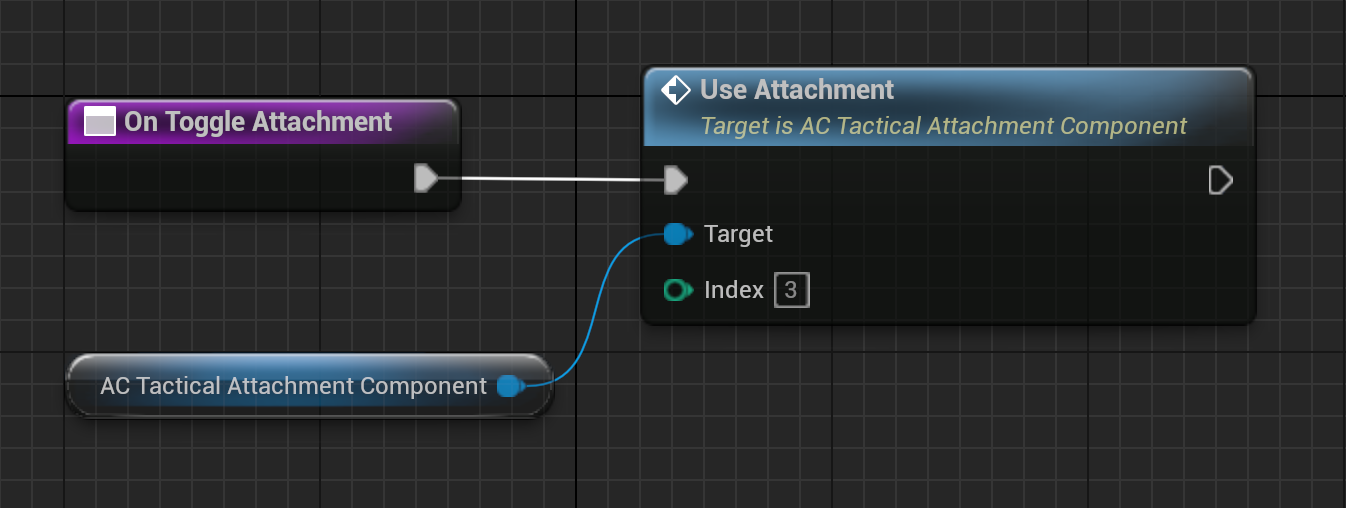
3, the underbarrel group. BP_Flashlight_LS3 overrides Use Attachment to toggle its SpotLight component.
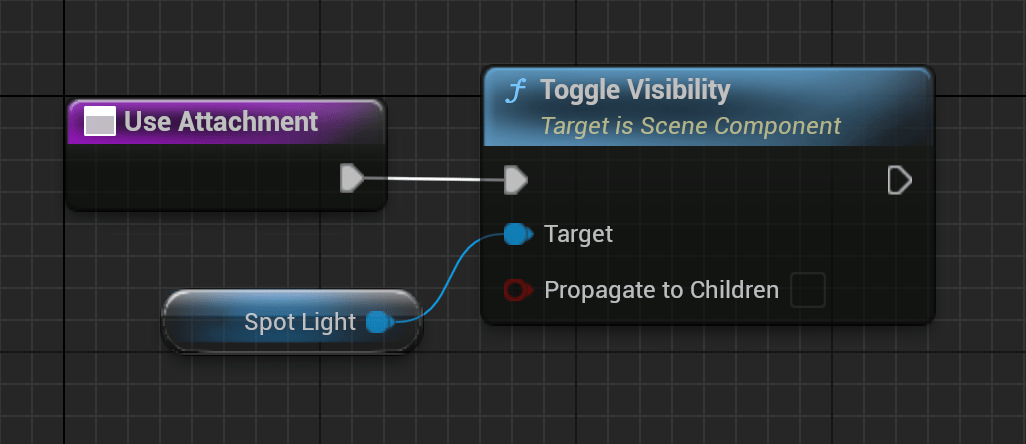
BP_Flashlight_LS3 ▸ Use Attachment
BP_WeaponAttachment, controls whether the attachment actor is hidden when changing selections or equipping weapons.
Common issues
For the surrounding player and weapon setup, see Player and Weapons.