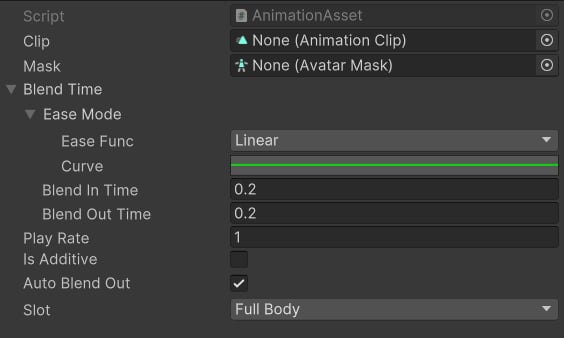
An Animation Asset is a ScriptableObject that bundles an Animation Clip with all the blend settings CAS needs to play it. Rather than scattering blend times and playback speeds across your gameplay scripts, you define them once in the asset and reference the asset wherever you need it. This keeps your code clean and lets designers iterate on feel without touching code.

Creating an Animation Asset

1

Open the Project window

Navigate to the folder where you want to store animation data.
2

Right-click and create the asset

Select Create ▸ KINEMATION ▸ CAS ▸ Animation Asset from the context menu.
3

Configure the asset

Select the new asset and fill in its properties in the Inspector.

Properties

AnimationClip
required
The Animation Clip to play. Assign any clip that is compatible with your character’s Avatar.
AvatarMask
Restricts which bones this animation affects. Leave empty to affect all bones, or assign an AvatarMask to limit the clip to specific body parts such as the upper body or the right arm.
Enum
The easing function applied during blend in and blend out. Choose a curve style that fits the motion — for example, a smooth ease-in/out for idle poses, or a linear ramp for responsive combat actions.
float
Seconds the animation takes to reach full weight when played. Lower values produce a snappier cut; higher values produce a smooth crossfade.
float
Seconds the animation takes to fade to zero weight when stopped or when Auto Blend Out triggers. Ignored if you call StopAnimation with an explicit blend-out time.
float
Playback speed multiplier. A value of 1 plays at the original clip speed; 0.5 plays at half speed; 2 plays at double speed.
bool
When enabled, CAS applies this animation additively on top of the current pose rather than blending it in as a full replacement. Use this for subtle layered effects such as breathing or sway.
bool
When enabled, CAS automatically begins blending out when the clip reaches its end. Disable this for looping animations or for clips you want to hold on the last frame.
AnimationSlot
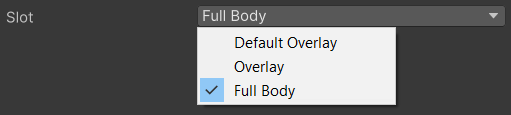
Determines where in the playable graph this animation is inserted. See Animation Slots below.

Animation Slots

Slots define at which stage of the graph CAS inserts a clip. Choosing the correct slot ensures the animation interacts with Dynamic Bones and other layers in the way you intend.

Default Overlay

Use Default Overlay for general animations where you want to preserve the result of Dynamic Bones. When a clip plays in this slot, Dynamic Bone calculations run after the clip, so the bone positions they produce are not overwritten. Example: If a Dynamic Bone positions a slung weapon on the character’s back and you want that position maintained, use Default Overlay for any animation that should respect it.

Overlay

Overlay is applied after Default Overlay. Use this slot when the animation should drive Dynamic Bones — in other words, when you want the clip to influence the input that Dynamic Bones use to calculate their output. Example: A reload animation that physically moves the weapon and should cause the Dynamic Bone on the magazine to react accordingly should use the Overlay slot.

Full Body

Full Body is applied last, after all blending, and affects the entire character pose. Use this for animations that need to take complete control of every bone — such as climbing, scripted death sequences, or cinematics.
Full Body animations override the Layered Blending result entirely for the duration they are active. Make sure the clip includes data for every bone you want to control.

Playing and Stopping Animations

Use CharacterAnimationComponent to play or stop an Animation Asset at runtime.

API Signatures

  • PlayAnimation returns true if the animation started successfully and false if it was rejected (for example, if the same asset is already playing).
  • startTime lets you begin playback from a normalised position in the clip (0 = beginning, 1 = end).
  • Pass an AnimationMixerEvent[] array to the second overload to attach time-based callbacks. See Custom Events below.
  • StopAnimation accepts an optional blendOutTime that overrides the value set on the asset.

Example

Custom Events with AnimationMixerEvent

You can attach time-based callbacks to a PlayAnimation call by passing an array of AnimationMixerEvent objects. CAS invokes each callback when the clip’s normalised playback time reaches the value you specified.

Constructor

Delegate Signature

  • animationAsset — the Animation Asset that triggered the event.
  • normalizedTime — the normalised playback time [0..1] at which the event fired.

Example

Use AnimationMixerEvent callbacks to synchronise gameplay events — such as spawning effects, playing sounds, or toggling colliders — precisely with animation progress rather than relying on fixed timers.