CAS ships with a preset-based setup wizard that inspects your character’s skeleton, creates the required ScriptableObjects and prefabs, and wires everything together automatically. For most projects, the Basic preset covers everything you need without touching a line of code.
If you are following this guide for the first time, use the Kinemation Mannequin model located at KINEMATION/Shared/Character. Its skeleton matches the UE4/UE5 naming convention and all bones will be detected automatically.
This tutorial uses the demo content. Make sure you have completed the Install Demo Content step before continuing.

Open the Setup Wizard

1

Add your character to the scene

Drag your character model (or the Kinemation Mannequin prefab) into the Hierarchy.
2

Right-click and choose Setup CAS

Right-click the character GameObject in the Hierarchy and select KINEMATION → Setup CAS. This opens the Character Animation Setup window.
3

Select the Basic preset

In the preset list, choose Basic. Additional presets appear here if you have optional CAS add-ons installed.
The Manual option gives you full control over every component, but is intended for experienced users. The rest of the quickstart guide assumes Basic.

Configure the Preset

The Basic setup window walks you through four sections. Complete them in order from top to bottom.

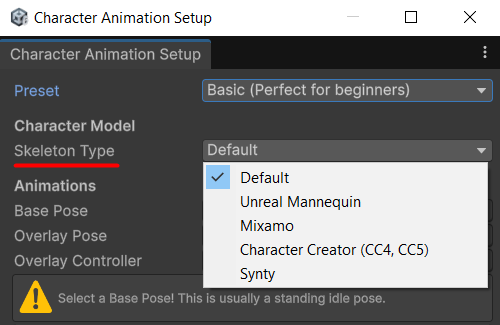
1. Skeleton Type

Select the naming convention your character model uses. CAS uses this to locate bones automatically:
When in doubt, start with Default. CAS will search recursively and warn you if it cannot find a required bone.

2. Animations

Assign the animation clips that define how your character looks and moves. Base Pose — the standing idle animation for your character. CAS samples this clip at runtime to compute additive offsets, so it should represent the character’s neutral, relaxed standing position. Overlay Pose — an animation clip that represents the character’s current gameplay state. This is typically a weapon or item pose (holding a torch, aiming a rifle) or a body-state pose (injured, unarmed). At runtime, CAS blends the Overlay on top of the Animator output using per-bone curve weights. Overlay Controller — an Animator Controller that serves the same purpose as an Overlay Pose, but adds states, transitions, and blend trees. Use this when your overlay needs multiple states, for example:
  • Idle Aim
  • Idle Rest
  • Tactical Sprint
Use an Overlay Controller any time your item or state has more than one pose, or when you need draw/holster/attack/block as distinct states with transitions.
If you assign both an Overlay Pose and an Overlay Controller, CAS uses the Overlay Controller and ignores the standalone clip.

3. Bones

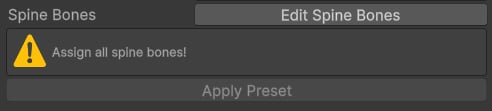
CAS lists the bone references it needs to create Procedural Animation modifiers (foot IK targets, hand IK targets, spine chain, and so on). When you select a skeleton type, CAS attempts to populate these fields automatically.
  • If all bones are resolved, the panel shows a Good to go! confirmation message.
  • If any bones are missing, a warning highlights which slots need manual assignment. Drag the correct transforms from the Hierarchy into the empty fields.

4. Apply Preset

Click Apply Preset. CAS generates:
  • A Character Skeleton prefab — a variant of your model with the CharacterSkeleton component attached.
  • A CAS Settings ScriptableObject — the main data asset that links Overlay and Procedural settings.
  • A Procedural Animation Settings ScriptableObject — defines the modifier stack for this character.
  • IK target GameObjects added to the character root.
See the After Setup page for a full explanation of each generated asset.

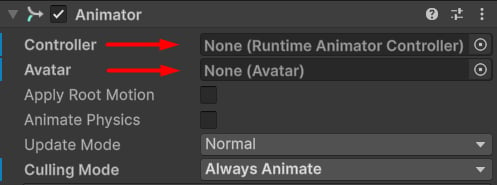
5. Assign Animator Controller (Generic rigs only)

If your character uses a Generic rig (rather than a Humanoid Avatar), assign an Animator Controller to the Animator component on the skeleton prefab after applying the preset. CAS does not restrict which Animator Controller you use — any controller that drives your character’s locomotion states will work.
Humanoid rigs using Avatar retargeting do not require this step; the Animator Controller is assigned in the Avatar setup and CAS reads from it automatically.