The Aim At modifier rotates one primary bone as precisely as possible toward a world-space target, then optionally distributes the remaining rotation through a set of support bones. This lets a character look at or aim toward a point of interest without requiring a separate Blend Tree — the procedural layer handles the rotation at runtime on top of whatever animation is already playing.

Properties

KRigElement
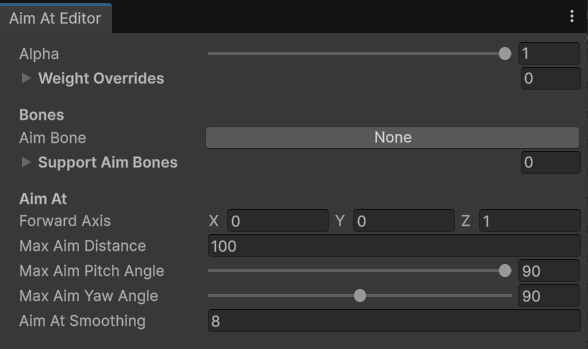
The primary bone that must align to the target as accurately as possible. This is typically the head, neck, or a weapon bone — whichever bone carries the final pointing direction.
KRigElement[]
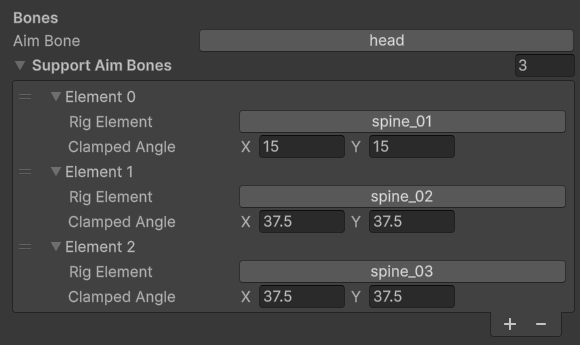
Additional bones that also rotate toward the target to share the motion across the body. Adding spine or neck bones here distributes the rotation naturally so the motion does not hinge on a single joint.
Vector3
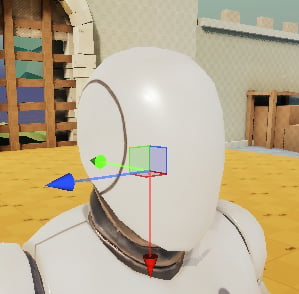
The local axis of the Aim Bone that should point at the target. You must match this to the bone’s actual local forward direction — select the bone in the Scene view and check which axis aligns with “forward” before filling in this value.
float
default:"100"
Cancels aiming when the target exceeds this distance in world units. Set to a high value if you want aiming to remain active at long range.
float
Disables aiming when the required pitch (vertical) rotation exceeds this limit in degrees. Use this to prevent the character from craning unnaturally when a target is directly above or below.
float
Disables aiming when the required yaw (horizontal) rotation exceeds this limit in degrees. Useful for preventing the character from aiming behind themselves.
float
default:"8"
Interpolation speed used to blend toward the target rotation. Higher values snap faster; lower values produce a more damped, cinematic feel. A starting value of 8 works well for most gameplay scenarios.

Driving the Modifier at Runtime

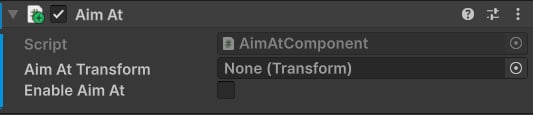
The Aim At modifier is typically controlled through the Aim At component, which you add directly to the character GameObject.
Add the Aim At component to your character, then assign a target Transform in the inspector. You can also write to aimAtPosition directly each frame if you want to drive aiming from a computed position rather than a scene object.

Setup Guide

1

Identify the aim bone's forward axis

Enter Play mode (or use the Scene view’s bone overlay), select the Aim Bone, and note which local axis points “forward” — the direction you want to align to the target. Exit Play mode and enter that axis in the Forward Axis field.For example, if inspection shows the head’s forward axis is (0, -1, 0), enter (0, -1, 0) in Forward Axis.
2

Assign the aim bone

Set Aim Bone to the bone that should point most accurately at the target — usually the head or a weapon bone.
3

Add support bones

Populate Support Aim Bones with spine and/or neck bones. This distributes rotation across the chain, preventing the motion from hinging unnaturally on the aim bone alone.
4

Configure limits and smoothing

Set Max Aim Distance, Max Aim Pitch Angle, and Max Aim Yaw Angle to match your gameplay constraints. Adjust Aim At Smoothing to taste — 8 is a reasonable default for a responsive third-person character.
5

Add the Aim At component

Add the Aim At component to your character and assign the target Transform, or drive aimAtPosition at runtime from your camera or targeting system.

Use Cases

  • NPC gaze and tracking — make enemies or NPCs look toward the player character or a point of interest without extra Blend Tree states.
  • Spine aiming for third-person shooters — rotate the upper spine and head to follow the camera’s aim direction, keeping the lower body in the current locomotion pose.
  • Weapon bone alignment — point a weapon or rifle bone directly at a target lock-on point for precise aiming overlays.
  • Head look-at — have a character’s head follow an interactive object as the player approaches it.
When using Support Aim Bones, the total rotation is distributed evenly across all bones in the list to reach a 90-degree target. You do not need to calculate per-bone angles manually — the modifier handles distribution automatically.
If aiming is cancelled by any of the angle or distance limits, the character smoothly returns to the base animation pose rather than snapping. The Aim At Smoothing value governs both the blend-in and blend-out speed.